Create a Data Extract Import Job for a Previously Exported Data Extract Job
You can re-import previously exported Data Extract Jobs for further culling. To create a Data Extract Import Job, proceed through the following steps:
|
|
Note: Supported formats are one ItemID per line. Valid formats include:
Also:
However, suffixed image key numbers are not supported. For example, these would be invalid:
|
-
Right-click Data Extract Jobs underneath the proper Custodian.
-
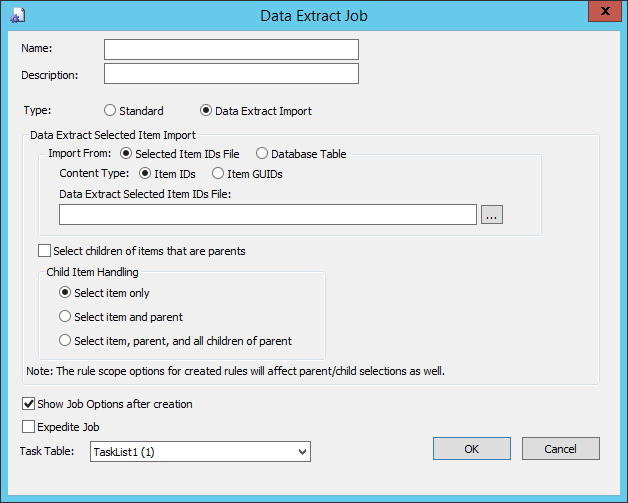
Choose New Data Extract Job. The Data Extract Job dialog box appears.

-
Enter a Name.
-
Enter a Description.
-
Select Data Extract Import as the Job Type to display the options for a Data Extract Import Job for a previously exported Data Extract Job.
-
Under Data Extract Selected Item Import:
In Import From, choose Selected Item IDs File or Database Table.
In Content Type, choose ItemIDs or ItemGUIDs - ItemGUIDs allow for a more reliable method to positively identify eCapture Items records for a Client.
-
If you chose Selected Items IDs File:
- Browse to the file. This file is either a text file or a CSV containing a list of Item IDs. After selecting the file, the path displays in the Data Extract Selected Items IDs File field.
- Proceed to step 7.
-
If you chose Database Table:
-
Specify the SQL database table that contains the ItemIDs list or an ItemGUID list.

Note: This table must be created in the Client database.
For ItemID, the first column of the table must be an integer field named ItemID. For ItemGUID, the first column of the table must be named ItemGUID and defined as nvarchar(36). This is the only requirement for the tables. The rest of the tables may contain any fields or no fields. The location of the tables must be in the client database, [CONFIG]_[CLIENT].
- Select the option Validate ItemIDs in Table if you want to have the system check for the existence of ItemIDs or ItemGUIDs in the Items table. If the system does not find any ItemIDs or ItemGUIDs, an error occurs. If some ItemIDs or ItemGUIDs are missing, it will indicate the missing items in a LOG file named ImportMissingItems.LOG located in the Job folder.
-
Proceed to step 7.
Note: For either of the previous two Import From options, a Flex Processor rule is created (criteria being the ItemID list) for the main imported list. Also, additional rules could be created based on the selected Child Item Handling options. The Scope for each of these rules may be changed as well, further affecting what other documents will be selected. As you click each rule created from the imported list, the ItemIDs may be viewed in the ItemID area on the Advanced Criteria Tab.
-
-
-
Select from the following options:
Select children of items that are parents: Processes the parent item with attachments.
Child Item Handling - choose one of the following:
- Select item only
- Select item and parent
- Select item, parent, and all children of parent
Note:The rule scope options for created rules affect parent/child selections as well.
-
(Optional) Clear Show Job Options after creation if you do not want the Project Options to display.
-
(Optional) Select Expedite Job if you want the Job pushed to the front of the queue.
-
Select a Task Table from the drop-down menu. The task table that displays in the field is based on the task table selected for the Custodian.
-
Click OK. The Data Extract Job Options dialog box appears.
Related Topics