|
|
Important: You are reviewing the Ipro for desktop 3.0 Help. To view the latest release of Ipro for desktop Help, click here. |

Add, Edit, or Remove a Transcript
In order to add, edit, or remove a transcript, you must first navigate to the Transcript Viewer located in Review. To reach the Transcript Viewer, follow the instructions laid out in the section below.
Open the Transcript Viewer
- From the Dashboard, click on the Review module.
- A dialog box displays, prompting you to select the appropriate Client and Case. Double click on the correct Client (or click the plus icon
 beside their name) to expand a tree of all cases associated with that client. Locate the correct case and then click Open. The Review work area displays.
 - Locate the Transcripts tab in the Case Folder pane on the left of the Review work area.
- Double click the Transcripts tab to open the Transcript Viewer. You are now ready to review your transcripts. The figure below shows the transcript viewer, along with the names of each section:

![]()

|
Note: If you do not have access to transcripts, contact your administrator. |
![]()
|
|
Note: In the far, right corner of the Transcript Work Area menu bar there is a bell icon. When the bell icon is white, When the bell icon is blue, |

 , this is an indication that other users have made changes to the case that are not visible to you. You must click the bell icon to refresh your view of the case to see the changes that other users have made.
 , your view of the case is up to date.
 For instructions on how to proceed through each one of these tasks, follow the steps listed below:
Add a Transcript to Review
You can add a supported transcript file type to an open case in Review using any of the methods described below:
-
Drag and Drop
-
The Transcripts Explorer Ribbon Bar
Drag and Drop
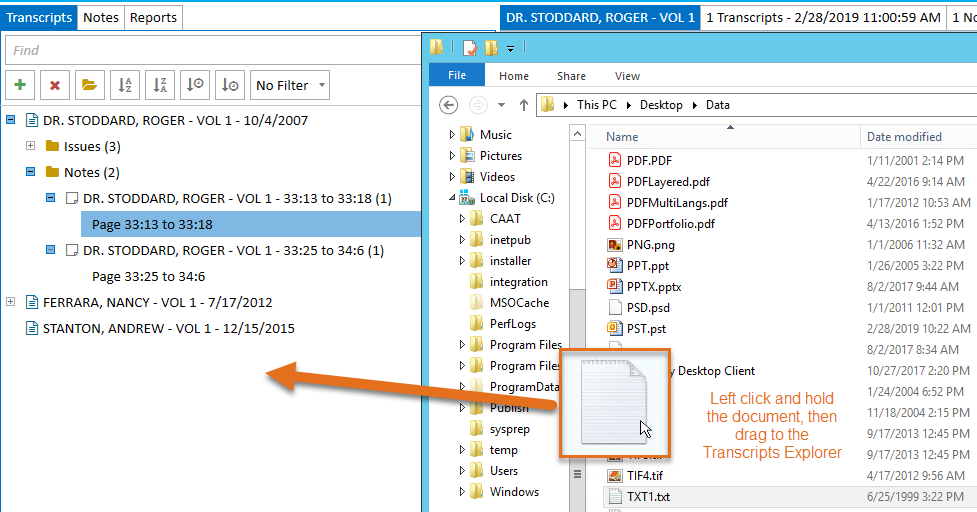
The easiest way to add a transcript is the drag and drop method. Open the appropriate case in Review and navigate to the Transcript Viewer (for instructions on how to do this, see Open the Transcript Viewer), then follow the steps below:
-
Open the file location in the local file explorer.

-
Hold left click on the file and drag the file over to the Ipro for desktop Review Transcripts Explorer.

-
Release left click to drop the file into the Transcripts Explorer.
-
Progress through the Add Transcript wizard by filling in the fields and clicking the Next button.
-
On the Summary page, click the Add button.
|
|
Note: You may also drag files directly from your desktop. |
The Add Transcript wizard appears with information from the transcript file populating the fields.
![]()
You can change the properties of the transcript on the first page of the wizard.
The transcript is added to the case and appears in the Transcripts Explorer.
Transcripts Explorer Ribbon Bar
To add a transcript to the case via the Transcripts Explorer, open the appropriate case in Review and navigate to the Transcript Viewer (for instructions on how to do this, see Open the Transcript Viewer), then follow the steps below:
-
Open the Transcripts Explorer.
-
Click the Add button in the explorer's ribbon bar.
-
Navigate to the transcript to be added.
-
Select the file.
-
Click the Open button in the file explorer.
-
Progress through the Add Transcript wizard by filling in the fields and clicking the Next button.
-
On the Summary step, click the Add button.
The transcripts already added to the case appear.

The local file explorer appears.
![]()
The Add Transcript wizard appears with information from the transcript file populating the fields.
![]()
You can change the properties of the transcript on the first page of the wizard.
The transcript is added to the case and appears in the Transcripts Explorer.
The Add Transcript Wizard
The Add Transcript wizard is separated into the following steps:
-
Transcript Details - This step allows you to enter identifying details about the transcript. Only the Name, Transcript Type, and Deposition Date fields are required.
-
Summary - This step allows you to review the properties and settings for the transcript. If there are any errors, you can click the Edit button and fix any issues.
-
Confirmation - This is an automatic step that notifies you whether the transcript was successfully added to the case.
Edit Transcript Properties
You can change a transcript's properties from the Transcripts Explorer.
To change a transcript's properties, use the following steps:
-
Open the Transcripts Explorer (see Open the Transcript Viewer for instructions).
-
Right-click on a transcript.
-
Click the Properties button.
-
Make any changes to the transcript properties.
-
Click the Save button.
The right-click context menu appears.
![]()
The Transcript Properties dialog appears.
![]()
The updated transcript properties are saved.
Remove a Transcript from Review
You can remove a transcript completely from a case using the Transcripts Explorer.
To remove a transcript, open the Transcripts Explorer within a case (see Open the Transcript Viewer) and follow the steps below:
-
Select the transcript to be removed.
-
Click the Remove button in the Transcripts Explorer ribbon bar.
-
Click Yes.

A confirmation message appears.
The transcript is removed from the case.
|
|
Note: You can also right click on the transcript you want to remove from within the Transcripts Explorer and access the Remove button from the context menu. |
Related Topics
Version: 2019.3.0
Last Modified: December 2, 2019