Create a New Case in OPEN DISCOVERY
Case creation is easy in OPEN DISCOVERY. There are different types of cases you can create, each of which serving a different purpose. To learn more about the different case types, see Case Management.
Complete the following steps to create a new case in OPEN DISCOVERY.
|
|
Note: Before you create a new case, ensure that the associated managing client and client have already been created. If not, see Create New Managing Clients and Clients. |

-
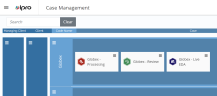
Open the Case Management module.
-
Take one of the following actions:
-
To associate the new case with a new code name: Click
 corresponding to the required client and select Add Case.
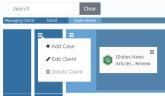
-
To associate the new case with an existing code name: Click
corresponding to the required code name and select Add Case.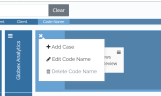
-
-
On the Create Case page, click the required case type(s), then select Create. To learn more about the different case types, see Overview: Case Management.
-
On the Code Name step of the Create Case wizard, enter information for any of the following fields:


Note: These options are able to be modified only if associating the new case with a new code name.


-
Click Next. Complete the case details page(s) as described in the following table.
Note: Specific pages/labels will differ, depending on the type of case you are creating (Processing, Review, and/or LIVE EDA).
-
If you checked the box to use an existing case for a settings template, you must select the case you wish to use. This will be available for both Processing and Review cases.

-
To use a default template, ensure that the term “default template” is listed in the Case Template field.
-
To use a custom template(s): Select the required template(s), depending on which type of case is being created:
-
For a Processing case, click in the Processing Case Template field. In the resulting dialog box, navigate to and select the required .INI file, then click Open.
-
For a Review case, click in the Review Case Template field. In the resulting dialog box, navigate to and select the required .CSE file, and then click Open. See Workflow: Create a Case Definition Template for more information.
-
-
Click Next to review the Summary page. If any items must be changed, click Back (or the required page button at the top of the page) and make corrections.
-
Click Create Case. Wait as the case is created. When finished, it displays in the Case Management page summary.
|
ITEM |
Description |
|
Code Name* |
Enter the new code name using a maximum of 256 Unicode characters. For example, “Smith v. Jones.” |
|
Matter Number |
Optional: Enter a matter number using a maximum of 128 Unicode characters. A matter number is an additional internal identifier organizations may use to facilitate reporting. In OPEN DISCOVERY, assigning a matter number is optional and not required. |
|
Client |
Review the selected client. If the wrong client was selected, click Cancel and start again with the correct client. If you want to use an existing case as a settings template, check the box . |
|
ITEM |
Description |
|
Case Name* |
Enter the full name for the new case. By default, it will be the code name with a suffix indicating the case type. For example, “Smith v. Jones – Processing.” Ensure the name is unique. |
|
App Environment* |
Select the needed Processing and/or Review environment. Check with your administrator if you are not sure of the environment to select. |
|
Data Directory* |
For Review cases, select the required data directory. The data directory is where OPEN DISCOVERY Review places database-specific files and other files required for the case, see Create New Managing Clients and Clients |
|
Connectors, Custodians, and Groups* |
For LIVE EDA cases, select the required connector locations, custodians, and groups. For more information about the options available, see Create LIVE EDA Case. |
|
Advanced Options |
|
Related Topics