Consult with your System Administrator for additional
SQL Server configuration requirements prior to using eCapture.
- Start
the by double-clicking the icon on the desktop or
choosing it from the Windows Start menu. The first time it is started,
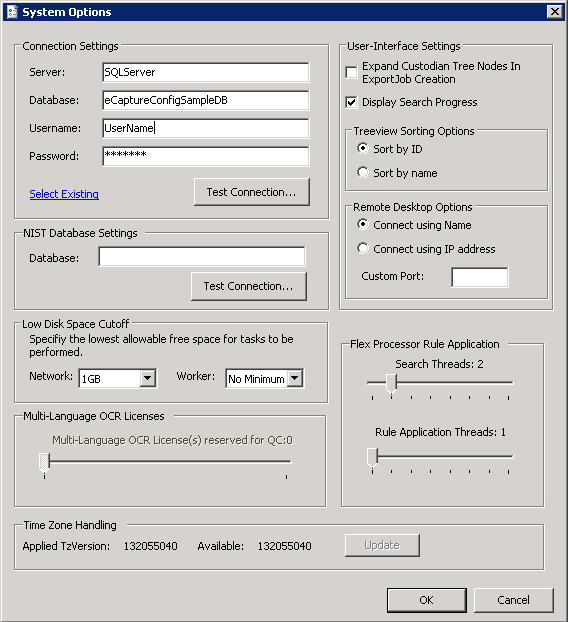
the System Options dialog appears. (If it does not appear, choose View
> System Options from the menu bar.)
 Enter
the information required to establish the connection:
Enter
the information required to establish the connection:
- If
the connection is not established, the dialog will present some options
to try in order to establish the connection.
- If
the connection is successful, the dialog will state: The connection was
tested successfully. Click OK to close this dialog.
- From
the Low Disk Space Cutoff box, select a value for the Network and/or Worker.
Under
User-Interface Settings, select from:
- Expand
Tree Nodes in Export Job Creation is selected by default. When
an export job is started, every node is usually expanded. If there are
a lot of custodians, there usually will also be a lot of processing jobs.
This option, when selected, will minimize the amount of time it will take
to scroll through the tree.
- Display
Search Progress is selected by default. When Search criteria is selected
in the Flex Processor Rules Manager and applied or previewed, a search
progress meter appears. Deselect this option to hide the search progress
meter.
- Select a Tree View Sorting option. The tree
view in the Management tree view can be sorted by either (default)
or by name (alphabetically). Sorting applies to all entities. The tree
view collapses
(refreshes) after an option is selected.
- Select
a Remote Desktop option. These settings are available for both the Full
and and allow for connecting via remote desktop to
a specific worker. The machine name and
IP address is stored in the Status Information tab. Select the
method to connect by:
- Connect
Using Name
- Connect
using IP address
Enter a Custom Port value to optionally connect
to a non-default port. All connection requests use the same port. Executed
by building a command string and shelling to mstsc.exe.
- Under
Multi-Language Licenses, (as of version 2016.3.1) this control is
used to support the multi-language OCR worker license type. The maximum
number of multi-language OCR licenses that may be reserved for QC are
one less than the number of multi-language OCR licenses that exist. For
example, for 10 multi-language OCR licenses, the max value may be set
to 9. Slide the control to reduce the number of licenses and to keep the
Worker from consuming all available licenses.
- Under
Flex Processor Rule Application, adjust the Thread values for:
- Search
Threads (Default value is 1, maximum value is 8)
Adjust this value to allow for how many dtSearch rules can run simultaneously. A
higher value will use more resources from the eCapture Controller; however, it will
allow multiple searches to finish faster if the Controller machine has enough processor
capacity. Too many threads may not be handled well on slow or heavily loaded machines.
- Rule
Application Threads (Default value is 1, maximum value is 8)
Adjust this value to allow for how many non-dtSearch rule applications can run at
once (file type filters, item ID imports, etc). These rule applications impact the
SQL server rather than the eCapture Controller, and in turn can impact how well eCapture
runs on the whole due to increased SQL activity while rules are applied.
- (Optional) NIST Database Settings:
- Enter the name of the database. Note: The NIST database is optional. It does
not come with eCapture. For information about NIST, visit http://www.nsrl.nist.gov.
- Click
 . A dialog appears with connection status information.
- Under
Time Zone Handling: Click
 to pull the registry version into the two time zone database tables. An
hourglass appears indicating the update is in progress (wait before clicking
OK to close the System Options dialog). When the update is finished, the
versions will match. Versions can only be incremented, not decremented.
The button is enabled when a newer version is available.
If the available time zone version is lower than, or matches the installed
time zone version, the button is disabled.
to pull the registry version into the two time zone database tables. An
hourglass appears indicating the update is in progress (wait before clicking
OK to close the System Options dialog). When the update is finished, the
versions will match. Versions can only be incremented, not decremented.
The button is enabled when a newer version is available.
If the available time zone version is lower than, or matches the installed
time zone version, the button is disabled.
Time zone information is now stored in database tables in the eCapture
Configuration database. Worker machines will apply the time zone offset
value stored in the eCapture Configuration database. The Use Local Time
Zone option was removed from the Case () and Job Options dialogs.
For Cases (Projects) that were set to Use Local Time Zone, the Local Time
Zone is determined from the eCapture Controller machine when the Project
options are loaded and that time zone value is written to the eCapture
Configuration database.
When re-processing documents that are contained in Cases (Projects) prior
to this change and that were set to Use Local Time Zone, the local time
zone is determined from the QC machine and is written to the eCapture
Configuration database. This value is used during the re-processing
- Click
OK to close the System Options dialog. If you have not already done so,
start the Queue
Manager.
To start the eCapture Manager, right-click the eCapture Queue Manager icon
in the system tray and choose Start. The eCapture Queue Manager starts and the
icon color changes.