|
|
Important: You are reviewing the Ipro for desktop 3.0 Help. To view the latest release of Ipro for desktop Help, click here. |

Create a Clip
You can create a clip from a transcript using any of the following methods:
-
The Transcript Work Area right-click context menu
-
The Transcripts Explorer right-click context menu for an Issue Code page and line reference
-
The Issues Explorer right-click context menu for an Issue Code page and line reference
-
The Designations Explorer
-
The Clips Explorer ribbon bar
Transcript Work Area Right-Click Context Menu
To create a clip from a transcript, open a transcript in the Transcript Work Area, then follow the steps below:
-
Select text within the transcript in the Transcript Work Area.
-
Right click on the selected text.
-
Click the Create Clip button.
-
Enter the information for the clip.
-
Click the Save button.

The context menu appears.

The Create Clip dialog appears.
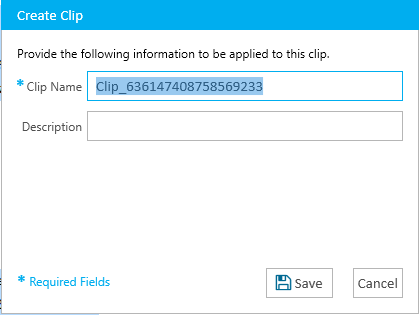
The clip is created from the selected text.
When a clip is created, it appears under its respective transcript in the Transcripts Explorer as well as in the Clips Explorer.
Transcripts Explorer
To create a clip from the Transcripts Explorer, open a case and follow the steps below:
-
Open the Transcripts Explorer.
-
Open the Issues folder, select an Issue Code page and line reference, then right-click and select Create Clip.
-
Fill in the information for the clip.
-
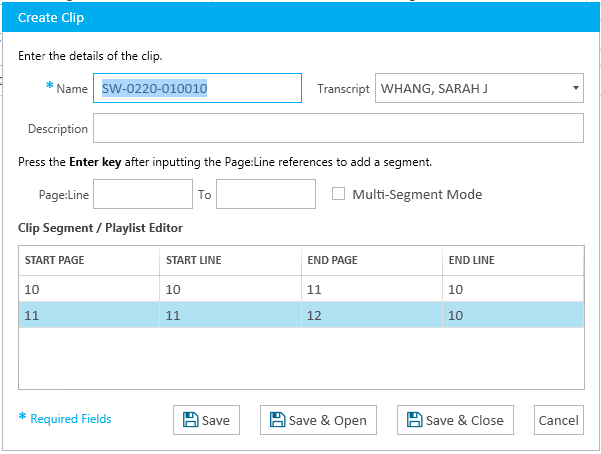
Name - The name to identify the clip.
-
Transcript - The transcript the clip is created from.
-
Description - A short phrase to help describe the clip or its purpose.
-
Page:Line (two text fields) - The transcript page and line reference range to create a segment of the clip. Pressing the Enter key after filling in the fields adds the segment to the segment playlist (e.g. 5:12 to 6:4).
-
Multi-Segment Mode - With this option selected, multiple segments can be added to the clip by continually entering Page:Line references and pressing the Enter key on the keyboard. If not selected, the clip only accepts one segment.
-
Click the Save button.
-
Save - Saves the clip, does not close the dialog, and clears the fields so you can create another clip right away.
-
Save & Open - Saves the new clip and opens it in the Clips Work Area.
-
Save & Close - Saves the clip and closes the Create Clip dialog.
![]()
If the explorer is hidden, you can use the Explorer dropdown in the main menu to view it.

![]()

|
Note: Using CTRL-click, you can select multiple Issue Code anchors. When you right-click and select Create Clip, a new clip is created. The segments within the clip are ordered based on the order in which the clips were selected. |
The Create Clip dialog appears.
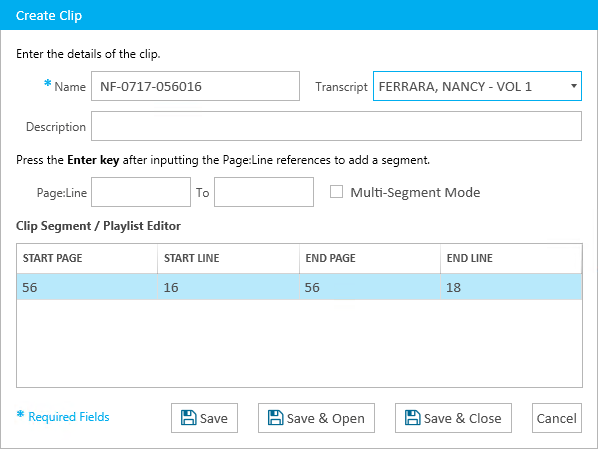
Enter the following information in the Create Clip dialog:
With the information filled in, you can move on to the next step.
There are three save options for your convenience:
When a clip is created, it appears under its respective transcript in the Transcripts Explorer as well as in the Clips Explorer.
Issues Explorer
To create a clip from the Issues Explorer, open a case and follow the steps below:
-
Open the Issues Explorer.
-
Expand the Issues folder for a specific Issue Code by clicking the
 button to the left of its name. Then expand the transcript underneath it, and right-click on a page and line reference. Select Create Clip from the context menu.

-
Fill in the information for the clip.
-
Name - The name to identify the clip.
-
Transcript - The transcript the clip is created from.
-
Description - A short phrase to help describe the clip or its purpose.
-
Page:Line (two text fields) - This is pre-populated with the information from the selected issue anchor.
-
Multi-Segment Mode - With this option selected, multiple segments can be added to the clip by continually entering Page:Line references and pressing the Enter key on the keyboard. If not selected, the clip only accepts one segment.
-
Click the Save button.
-
Save - Saves the clip, does not close the dialog, and clears the fields so you can create another clip right away.
-
Save & Open - Saves the new clip and opens it in the Clips Work Area.
-
Save & Close - Saves the clip and closes the Create Clip dialog.

If the explorer is hidden, you can use the Explorer dropdown in the main menu to view it.

|
|
Note: Using CTRL-click, you can select multiple Issue Code anchors. When you right-click and select Create Clip, a new clip is created. The segments within the clip are ordered based on the order in which the clips were selected. |
The Create Clip dialog appears.

Enter the following information in the Create Clip dialog:
With the information filled in, you can move on to the next step.
There are three save options for your convenience:
When a clip is created, it appears under its respective transcript in the Transcripts Explorer as well as in the Clips Explorer.
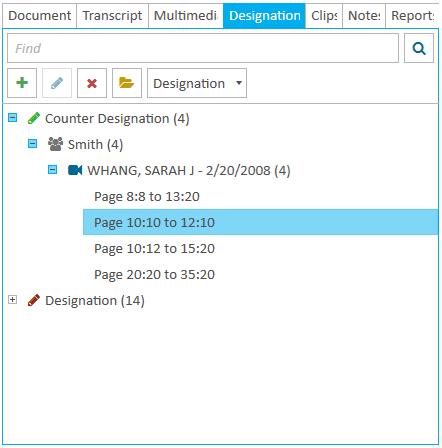
Designations Explorer
To create a clip from the Designations Explorer, open a case and follow the steps below:
-
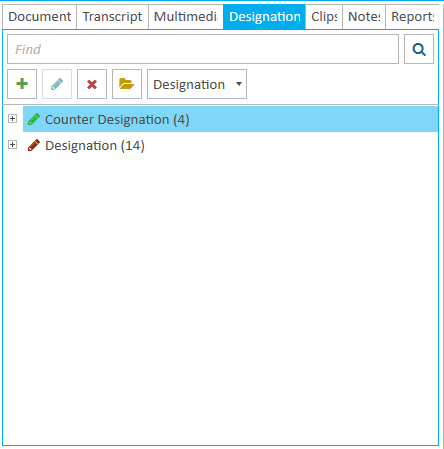
Open the Designations Explorer.
-
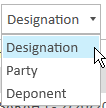
From the View drop-down, select Designation, Party, or Deponent.
-
Expand the group to the page and line reference you want to turn into a clip.
-
Right-click on a page and line reference, or CTRL-click on multiple page and line references, and select Create Clip.
-
Fill in the information for the clip.
-
Name - The name to identify the clip.
-
Transcript - The transcript the clip is created from.
-
Description - A short phrase to help describe the clip or its purpose.
-
Page:Line (two text fields) - This is pre-populated with the information from the selected anchor.
-
Multi-Segment Mode - With this option selected, multiple segments can be added to the clip by continually entering Page:Line references and pressing the Enter key on the keyboard. If not selected, the clip only accepts one segment.
-
Click the Save button.
-
Save - Saves the clip, does not close the dialog, and clears the fields so you can create another clip right away.
-
Save & Open - Saves the new clip and opens it in the Clips Work Area.
-
Save & Close - Saves the clip and closes the Create Clip dialog.

|
|
Note: You can CTRL-click to select multiple designations and create a clip from the selected designations. However, the selected designations must be designations for the same deponent.
To combine multiple overlapping page and line references into a single clip with a single clip segment, CTRL-click the overlapping segments and select Combine into Clip. When prompted to exclude objections, click No.
|
The Create Clip dialog appears.
Enter the following information in the Create Clip dialog:
With the information filled in, you can move on to the next step.
There are three save options for your convenience:
When a clip is created, it appears under its respective transcript in the Transcripts Explorer as well as in the Clips Explorer.
Clips Explorer
To create a clip from the Clips Explorer, open a case and follow the steps below:
-
Open the Clips Explorer.
-
Click the Add button in the explorer.
-
Fill in the information for the clip.
-
Name - The name to identify the clip.
-
Transcript - The transcript the clip is created from.
-
Description - A short phrase to help describe the clip or its purpose.
-
Page:Line (two text fields) - The transcript page and line reference range to create a segment of the clip. Pressing the Enter key after filling in the fields adds the segment to the segment playlist (e.g. 5:12 to 6:4).
-
Multi-Segment Mode - With this option selected, multiple segments can be added to the clip by continually entering Page:Line references and pressing the Enter key on the keyboard. If not selected, the clip only accepts one segment.
-
Click the Save button.
-
Save - Saves the clip, does not close the dialog, and clears the fields so you can create another clip right away.
-
Save & Open - Saves the new clip and opens it in the Clips Work Area.
-
Save & Close - Saves the clip and closes the Create Clip dialog.

If the explorer is hidden, you can use the Explorer dropdown in the main menu to view it.

The Create Clip dialog appears.

Enter the following information in the Create Clip dialog:
With the information filled in, you can move on to the next step.
There are three save options for your convenience:
When a clip is created, it appears under its respective transcript in the Transcripts Explorer as well as in the Clips Explorer.
Related Topics
Version: 2019.3.0
Last Modified: December 2, 2019