|
|
Important: You are reviewing the Ipro for desktop 3.0 Help. To view the latest release of Ipro for desktop Help, click here. |

Export Case Data
To export case data from Review:
-
Getting started:
-
Review details about exporting in Overview: Export and Replicate.
-
Determine the scope of the export – you can export the entire case, a batch, search results, or the contents of a Smart, Public, or Private Folder. Or, you can export a subset of the documents from any of these sources.
-
-
Open the needed source (batch, folder, etc.) or perform the required search, and make sure the corresponding tab is active in the documents pane.
-
Optional: Add, remove, and/or reorganize columns in the case table and/or sort the table. Columns selected in the table will be selected by default in the Export Data dialog box, and the sort order will be maintained in the export file.
-
Optional: To select a subset of documents, complete one of the following steps:
-
Select a contiguous set of records by clicking the first record in the set and then Shift+clicking the last record in the set.
-
Select a non-contiguous set of records by clicking the first record in the set and then Ctrl+clicking other records in the set.
-
-
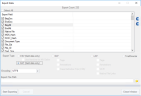
From the Review button menu, select Export Data > Export Data.
The Export Data dialog box displays.
-
Select the needed type of export file and options as described in the following steps.
-
To export to a .CSV or .DAT file:

TIP: Complete step 3 to define fields and the order in the case table instead of completing step a and b here.
-
In the Export Field list, select the fields to be included in the export file. Click the Select All option to select or clear all fields. At least one field must be selected.
-
As needed, change the order of fields to be included in the file. To do so, click on the field name (not the option box) so the field is highlighted, then click the up or down button,
 or
or  , to move the field to the desired location.
 -
Select the CSV or DAT option and skip to step 10.
-
-
To export to a .DLF file:
-
Select the DLF option.
-
Select DLF-specific options: Tags, Annotations, and/or Case Definition File.
-
Skip to step 10.
-
-
To export to an .LFP file:
-
Select the LFP option.
-
Select LFP-specific options: Tags, Annotations, OCR, and/or Native File Links.
-
Go to the next step.
-
-
Encoding: Select the character set to be used. Common encodings are available for selection.
-
Export File Path: Type the file path and file name, such as C:\My Cases\Data
-
Click Start Exporting. Wait as the export is processed.
-
When the export is completed, click Close Window.


|
NOTE: The number of documents selected displays in the title bar of the Export Data dialog box. |
Related Topics
Version: 2019.3.0
Last Modified: December 2, 2019