|
|
Important: You are reviewing the Ipro for desktop 3.0 Help. To view the latest release of Ipro for desktop Help, click here. |

Ingest Native Files
Overview
About native ingestion
If you receive native files without a load file, you can easily ingest them directly into an existing case. All major native file types can be ingested, including Microsoft Outlook® .PST and .OST files.
In addition, native file metadata, such as file properties, can be mapped to a case’s fields as needed.
Streaming
Streaming enables faster native ingestion. Using streaming you can ingest large numbers of native files much more quickly than the standard method, reducing processing time.
In addition to faster processing, Streaming provides you with the ability to perform deduplication and to ingest secure native files using a simple password file.
Deduplication
Ipro for desktop also offers deduplication for native ingestion. “De-duping” allows you to eliminate redundant documents from the native file set (and thus your case), at either the custodian or case level.
During ingestion, Ipro for desktop evaluates documents and assigns a SHA1_HASH value for each document, based on document analysis and the options you select. Only one instance of files with the same SHA1_HASH value is ingested into the case.
When deduplication is employed, duplicate files are maintained in their original location(s) and Ipro for desktop provides reports identifying duplicate files.
Basic ingestion process
When native files are ingested (either with the basic function or the Streaming function), the following actions occur:
-
New records, with image keys defined for ingestion, are added to the case.
-
Newly ingested native files are associated with the new case records.
-
Files contained in an archive file (such as a .ZIP or .PST file) are extracted and processed.
-
Email attachments are extracted and processed.
-
Streaming Ingestion only:
-
Inline/inserted files in emails (such as an inserted graphic or a logo in email footers) will be extracted and processed if the associated option is selected.
-
Files embedded in other files (for example, a Word file embedded in an Excel file) are extracted and processed.
-
-
Any native file that is an image format (TIFF, JPG, PDF, etc.), will be included as the image file for the document as well as its native file.
-
If you choose to deduplicate files, then Processing will evaluate all native files and ingest only one file of each SHA1_HASH value.
-
The following fields will be populated:
-
BEGATTACH, ENDATTACH
-
BEGDOC, ENDDOC
-
CUSTODIAN, DUP_CUSTODIAN (these fields will be populated if the ingestion definition calls for it.)
-
EXTRACTEDTEXT
-
NATIVE
-
MD5_HASH, SHA1_HASH
-
Other (depending on metadata in files and mapped fields)
-
-
The case is re-indexed (unless the Do not merge indexes after ingestion check box is checked).
|
|
NOTE: Image files created in this way will not have word coordinates for search highlighting in the Image tab; search highlighting will appear on the Extracted Text tab (and Quick View tab for text-based native files). If search highlighting is required on the Image tab, OCR the files as explained in Create Multiple Document Images (Bulk TIFF). |
Prepare to Ingest Native Files
Take the following steps before you begin the native ingestion procedure, based on the tasks you want to perform:
-
Make sure native files are available to the computer on which the ingestion will be performed. For example, if they are in a network location, ensure that the computer has access to that location.
-
Identify (or create) the case into which the files will be ingested, ensuring that needed fields exist. For new cases, the Native Ingestion Template can be used to help ensure all common fields (including those for email metadata) are included.
-
If you want to specify a custodian for the files being ingested, ensure that a CUSTODIAN field exists. If you will be performing deduplication, ensure that a DUP_CUSTODIAN field exists.
-
If you want to maintain original file name and path details for the ingested files, make sure that SINGLE_VALUE fields are defined for this purpose.
-
-
If you are using Streaming and some of the native files require a password to be opened, create a simple text file containing the needed passwords, one password per line. Notes:
-
Files for which passwords are not included will not be ingested.
-
Files for which passwords are provided will be ingested, but will not be viewable in the Quick View tab. When opening a native file from Ipro for desktop (in its native application), the password will be required.
-
Ingestion Procedure
After completing preparation (see above), perform the following steps to ingest native files without a load file:
-
On the Dashboard, click on the Processing module.

-
In the left navigation panel, under the Ingestion tab, click Native.
-
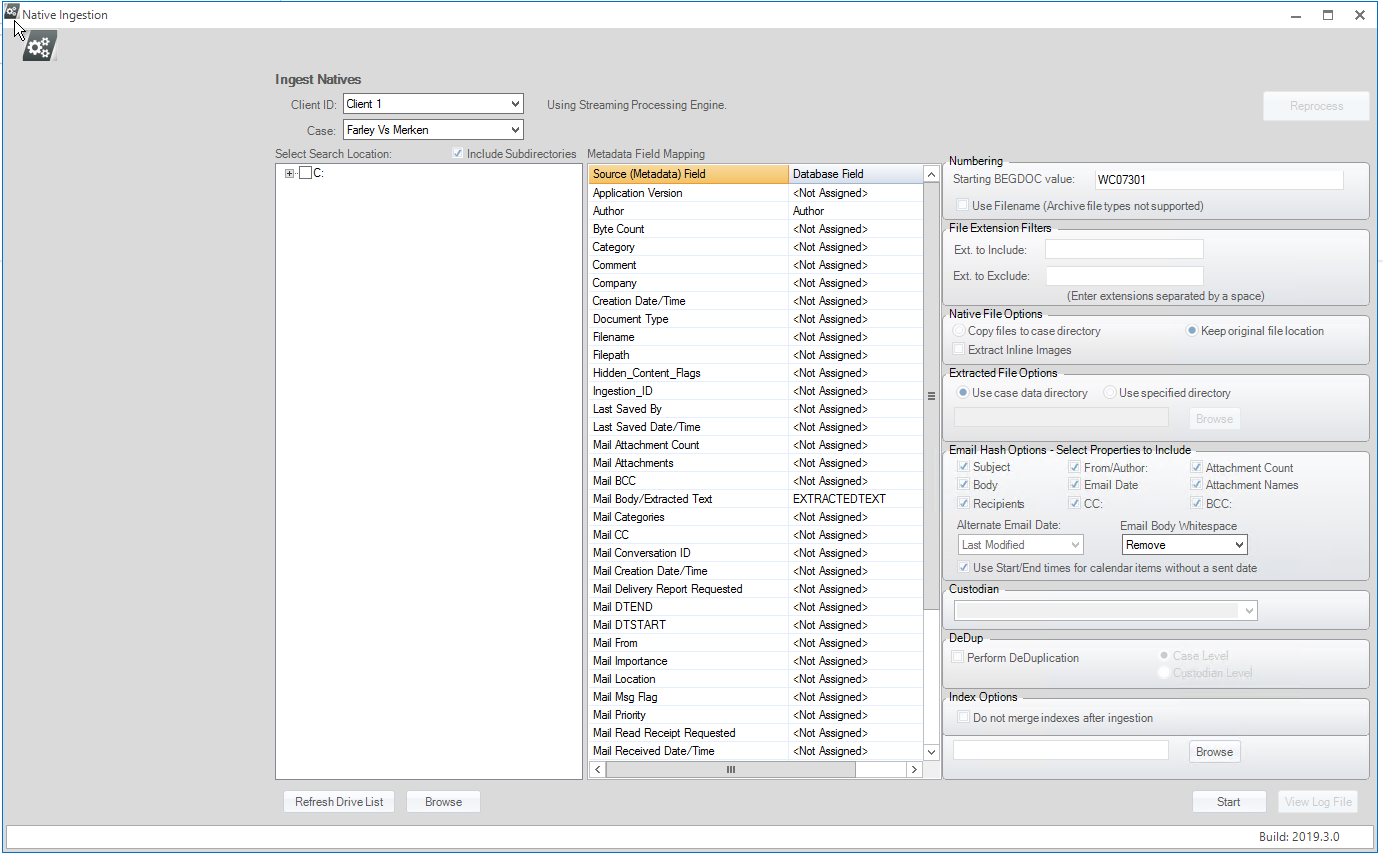
Review the Ingest Natives workspace and make needed decisions about the options. Review this procedure and see the following figure, which shows the Streaming workspace. For example, decide on an approach for mapping metadata and a numbering scheme for the files.
-
Extract Inline Images option
-
Deduplication options
-
Password List option
-
Select the needed client ID and case; complete workspace entries as described in the following steps:
-
Search Location: Take any of the following steps to select the needed location(s). All files of the types selected in step 8 found in this location will be added to the case.
-
If the file location is a mapped drive, select one or more drives.
-
If you add a new mapped drive or subdirectory(ies) in Windows, click Refresh Drive List at the bottom of the page to display the new mapped drive, etc.
-
If the file location is not listed, click Browse to navigate to and select a network or other location.
-
To search for native files in all folders in a specific location, select the Include Subdirectories option.
Or, click
 to open the folder “tree” and select specific subdirectories or specific files.
 -
-
Metadata Field Mapping: Processing identifies metadata found in the native files (for example, the Author and Title properties of a Microsoft Word document; the To, From, Subject details for emails, etc.), and matches it to fields in the case to the extent possible.
The original file name and path details can also be mapped if your case includes appropriate fields (see Prepare to Ingest Native Files).
Complete metadata mapping as follows:
-
Evaluate the mapping that has been completed. If all mapping is correct, skip to step 7.
-
For each field to be corrected, double-click the field in the Database Field list and take one of the following actions:
-
To change a mapped database field, click the correct field in the drop-down list.
-
To unmap a field, click <Not Assigned> at the top of the drop-down list.
-
To create a new field for the metadata, click <New Field> at the top of the drop-down list and complete the New Field dialog box.

Note: After the ingestion is complete, revise the field definition if needed; see Change Field Definitions. Or, evaluate the native file metadata; if any database fields are missing, stop the native ingestion, add new fields in System Administration with needed flags/options, then return to the native ingestion process.
-
-
-
Numbering: Define the needed image-key numbering scheme for the documents being added to the case. Take one of the following actions:
-
If a Starting BEGDOC value is listed and is acceptable, skip to step 8.
-
To define a new format and/or numbering set, enter the needed starting BEGDOC value.
-
To use each native file’s name as the BEGDOC value, select the Use Filename option. Do not select this option if you are ingesting files from any type of archive file (such as a .ZIP or .PST file).
Processing “remembers” previous entries and increments the last number used by one (1) after an ingestion is completed. This makes it easy to maintain a numbering scheme if you ingest more than one set of files (such as from multiple CDs or other media).
-
-
Extension Filters (optional): Specify the types of files to be ingested by either or both of the following options:
-
Manual Entry:
-
Include: Specify explicit file types to ingest.

Leave this field blank to include all supported file types in the location specified for ingestion. If there are unsupported file types in that location, an error will be recorded in the ingestion log (step 17).
-
Exclude: Specify file types to be ignored during the ingestion process. If you know that unsupported files are included in the location specified for ingestion, you can exclude them with this option to avoid error messages.

TIP: Ensure all needed file extensions are entered. For example, if you want to include .DOC, .DOCM, and .DOCX files, all extensions must be entered.
-
-
-
Native File Options:
-
Copy files to case directory or Keep original location: Select where native files should be located after they are ingested. The native file path will be correctly included in the case.
-
Extract inline images (optional): If you are using Streaming, for email files only, select this option to extract images or embedded objects in emails as separate documents. For example, if the body of an email includes an inserted image and two images in the footer, all three images will become separate documents. Documents created in this way are considered attachments to the original email.
-
-
Extracted File Options:
-
Select where you want attached/embedded files to be located after the native files are ingested and these files are extracted. For example, if an email message has an attachment, the email message will go in the Native File location and the attachment file will be in the Extracted File location.
-

-
-
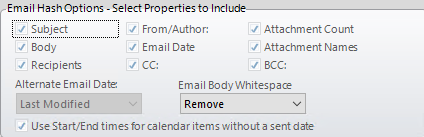
Email Hash Options (optional):
-
Select the details to be factored into the calculation of SHA1_HASH values for emails (see the following figure). For example, if only Subject is selected, then only the email Subject field will be used to calculate the SHA1_HASH value.
-
Depending on the options selected in step 11.a, select from the following options.
-
-
Custodian (optional): To specify a custodian for all documents being ingested, take one of the following steps:
-
Select an existing custodian name (if a list exists).
-
Enter the name of an existing custodian (using the same capitalization).
-
Enter a new custodian name. In this case, you will be asked to verify the addition of a new value during the ingestion.
-
-
DeDup (optional): If you are using the Streaming module, to ensure that duplicate documents are not ingested into the case, complete the following steps. (A SHA1_HASH field is required for deduplication, and a DUP_CUSTODIAN field must exist if you want to define a primary custodian.)
-
Select Perform DeDuplication.
-
If you selected a custodian in step 12, select the type of analysis to be performed:
-
Case Level: The files being ingested will be compared to all documents in the case.
-
Custodian Level: The files being ingested will be compared only to files for which the custodian is the same as the custodian specified in step 12.
-
-
If a custodian was specified in step 12, select or clear the Make selected custodian primary option:
-
Option selected: For any document being ingested that is a duplicate of one in the case, if a custodian is defined for the original document, the “ingestion custodian” will be added to the CUSTODIAN field (and will replace the existing custodian). The existing custodian will be added to the DUP_CUSTODIAN field.
-
Option not selected: If you do not select this option, for any document being ingested that is a duplicate of one in the case, if a custodian is defined for the original document, the ingestion custodian will be added to the document’s DUP_CUSTODIAN field.
-
-
- Do not merge indexes after ingestion - When checked, natives will be ingested but will not be searchable. To make the ingested natives searchable you will need to do a full text rebuild of indexes in Case Utilities. For more information, see Index Maintenance.
-
Password List (optional): If you are using Streaming and some of the files being ingested are password-protected:
-
Identify or create a plain text “password” file (such as .TXT or .CSV) that includes all needed passwords, one per line.
-
In the Password List field, enter the complete path and filename for the password file, or click Browse and navigate to/select the file.
-
-
Although the files are not ingested, records are added for the password-protected files and the following fields are populated: BegDoc, Filename, Extracted Path, MD5_Hash, and SHA1_Hash. These are the default field names in the Native Ingestion template. The DocumentType field includes “EXTRACTION ERROR.”
-
The error log lists files that are not ingested because they are password protected.
-
If there are any password-protected documents in your case that are not covered in your password list, a new “Reprocess” option will be available. After you add the proper password to your list, click the “Reprocess” button and select the error log file with the errored documents you wish to ingest into your case.
-
Once the job is defined, click Start.
-
If the Standard Ingestion engine was used on the first job of a case, then all other jobs in that case will be processed the same way.
-
If the Streaming Ingestion Module was used on the first job of a case, then all other jobs in that case will be processed the same way.
-
When the ingestion is complete, information will be located as follows:
-
The number of documents ingested will be noted at the bottom of the Ingest Natives workspace.
-
If errors occur, a message will display. Read the message and click OK.
-
If deduplication was performed and duplicate documents were found, a message will display. Note the path in the message and click OK.
-
-
To view details about the ingestion, click View Log File. A separate log file is generated for each ingestion session; clicking View Log File opens the current log. Files are named with a date/time indicator and they are located in the “Native Ingestion Logs” folder in the case data directory.
-
If deduplication was performed and duplicates were identified, two reports (.CSV files) are added to the “DeDup Logs” folder in the case data directory. Files are named with the ingestion date and time, using the format YYYYMMDD_HHMMSS.csv (for example, 20190507_105145.csv).
-
Check the ingested files in the Review document details tabs (Quick View, Extracted Text, etc.), or in Administration as follows:
-
In the Administration module, expand Case Management by clicking on the green arrow.
-
Click Case Management.
-
Select the needed client.
-
Select the needed case.
-
Click the Database Records tab.
-
Click List all Records and navigate to the records created for the newly ingested native files.
-
Click a document (if the page count is zero), or click
 next to a document (page count >0) of interest and click a page in the document.
 -
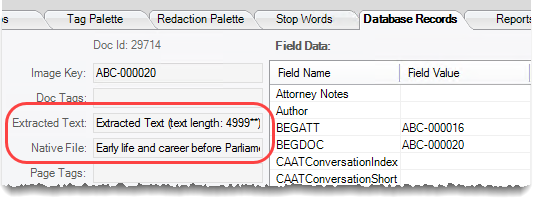
Ensure that the Native File field includes the correct file name and a size; the Extracted Text field may also contain details (depending on file type). The following figure shows an example.
-
An Image File should be included for native files that are image formats (TIFF, JPG, PDF, etc.), but for other files, the page count will be zero (until/unless images are ingested/created using bulk TIFF.)
-
Also review field data. Click the Field Name or Field Value column heading to sort the column. Also, the column width(s) can be increased by dragging the heading boundary to the desired size.
-
If the native file path is wrong, correct it as explained in Validate Paths and Fields.
-
Repeat this procedure as needed to check other newly ingested native files.
NOTES:
-
-
Inform your users that the new native files are available in the case and explain proper use of these files in their case review.
|
|
NOTE: The following features/options are available only with Streaming: |
|
|
TIP: If all drives do not appear, check drive status in Windows Explorer. Windows Explorer may incorrectly show drives as disconnected, even though they are connected and available. Once those drives are opened in Windows Explorer, Ipro for desktop will display them correctly in the Search Locations list. |
|
Option |
Description |
|
Alternate Email Date |
If the Email Date option is selected, select either Creation Date or Last Modified date to be used in the hash analysis for emails for which no sent date exists (such as draft messages). |
|
Email Body Whitespace |
If the Body option is selected, choose to Retain (include) or Remove white space between lines of text in the hash analysis. |
|
Use Start/End Times |
If the Email Date option is selected, select this option to use a calendar item’s start or end date in the hash analysis for calendar items for which no sent date exists (such as draft appointments). If this option is not selected, then the last modified/created date is used. |
The name will be added to the CUSTODIAN field for all documents, except as noted for deduplication (next step).
|
|
NOTES: When problems exist with password-protected files (e.g. you do not have a password file, some passwords are missing or incorrect, you are not using Streaming): |
|
|
NOTES: |
Wait as the job is processed. Status displays at the bottom of the workspace. (Time will vary depending on the number and types of files and options selected.)
One file provides details on all ingested files and duplicates found; the other is a summary report indicating number of duplicate files by type.
Related Topics
Version: 2019.3.0
Last Modified: December 2, 2019