|
|
Important: You are reviewing the Ipro for desktop 3.0 Help. To view the latest release of Ipro for desktop Help, click here. |
Back Up/Archive and Restore Case Data
Ipro for desktop provides an easy way for you to back up case data, either as part of a routine backup process or for archiving purposes. If needed, data can be restored after it is backed up.
Each time you perform a backup, case data is saved and time-stamped, providing “snapshots” of the data for each date/time.
Ipro for desktop recommends the following:
-
Back up case data on a routine basis, per company policy or backup best practices.
-
Definitely back up data before doing any heavy/intensive data manipulation such as importing large load files or deleting large document ranges.
-
Separately back up all case files (image, native, text) using your company’s file backup procedures.
-
When review of a case is completed, back up the data and archive it.
Back Up Case Data
To back up case data:
-
Preparation:
-
Select an appropriate time for backup activities.

Depending on the size of the database, system capabilities, and other factors, global functions may consume significant system resources and time. It is recommended that you carry out major global functions during “off hours” to minimize the impact to the system and your users. All users should be logged out of affected cases (in all components) when you back up case data.
-
Ensure that all users are logged out of the case(s) to be backed up.
-
Make sure the backup location has sufficient space.
Backup files are compressed to conserve space; in general, free space in your backup location should be at least 30% of the size of the case’s data directory. (For example, if the case data directory is 100 MB, then your backup location should have at least 30 MB of free space).
-
-
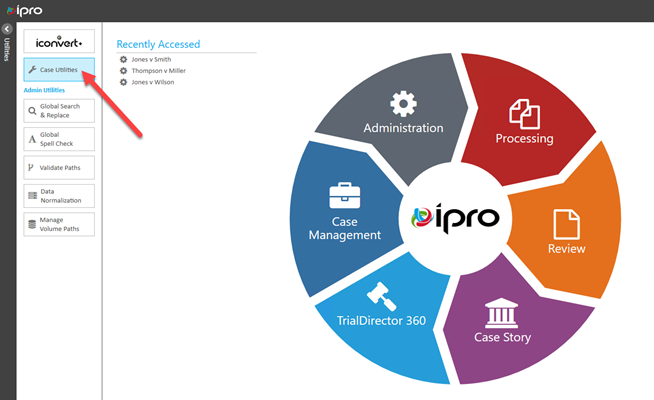
On the Ipro for desktop Dashboard, expand the Utilities menu in the top, far-left corner of the screen. Select the Case Utilities button from that menu to open the application in a new window.
-
In the Cases list, click the check box for one or more cases to be backed up.
-
Click the Archive/Backup tab.
-
Check the Archive Location—by default, the path will be the last location used. To change this path, enter or click
 to navigate to the needed location.
 -
Click Backup.Ipro for desktop checks the free space of the selected location. If available space is not at least 30% of the size of the selected case(s), a message displays. You can proceed (click Yes), but it is recommended that you cancel (click No) and select a different location that has the needed free space. The case size (in bytes) is shown in the Status area of the tab.
-
If needed, repeat this procedure to back up other cases.

|
NOTE: Changing the location will not move existing backup folders; it will place the current backup in the new location. |
Watch progress in the Status field. The amount of time required depends on case sizes and number of cases selected.
A success message displays in the Status field when the backup is complete and the job is added to the backup list.
Backup files are placed in a folder named as follows:
CaseName_YYYYMMDD_hhmmss_bk, where:
|
CaseName |
is the name of the case. |
|
|
is the date of the backup (year, month, day). |
|
hhmmss |
is the time of the backup in 24-hour format (hour, minutes, seconds). |
|
|
is a suffix indicating “backup.” |
Restore a Backup
Should it be necessary to restore a backup, complete the following steps:
-
Preparation:
-
Select an appropriate time for restore activities.
Depending on the size of the database, system capabilities, and other factors, global functions may consume significant system resources and time. It is recommended that you carry out major global functions during “off hours” to minimize the impact to the system and your users. All users should be logged out of affected cases (in all components) when you restore case data.
-
Make sure the backup location has sufficient space.
Backup files are compressed to conserve space; in general, free space in your backup location should be at least 30% of the size of the case’s data directory. (For example, if the case data directory is 100 MB, then your backup location should have at least 30 MB of free space).
-
-
On the Ipro for desktop Dashboard, click the Case Utilities button in the left corner of the screen. If the Case Utilities button is not visible, expand the Utilities menu in the top, far-left corner of the screen.
-
In the Case Utilities workspace, click the Archive/Backup tab.
-
In the list of backups, select the one to be restored. If multiple backups exist, ensure the correct one is selected. Backups are listed in order by case name and secondarily by backup date.
-
Click Restore. A message will suggest that you back up the case before restoring it.
-
To back up the case before you restore a previous version, click Yes. To skip this step, click No.
-
Watch progress in the Status field. The amount of time required depends on the size of the case.
-
When you click on the case in the Cases pane, a message displays informing you that case indexes need to be rebuilt. Click Yes to re-index the case now or No to do so at a later time.
-
If needed, repeat this procedure to restore other cases.
A success message displays in this field when the restoration is complete. All field data is overwritten with backup data, including “blanks” for fields containing no data in the backup.
Remove a Backup
If you no longer need a backup, remove it as follows:
-
On the Ipro for desktop Dashboard, click the Case Utilities button in the left corner of the screen. If the Case Utilities button is not visible, expand the Utilities menu in the top, far-left corner of the screen.
-
In the Case Utilities workspace, click the Archive/Backup tab.
-
In the list of backups, select the backup to be removed. If multiple backups exist, ensure the correct one is selected. Backups are listed in order by case name and secondarily by backup date.
-
Click Remove.
-
In response to the warning message, click Yes.
-
Watch progress in the Status field. A success message displays in this field when the removal is complete. The backup folder and all files are removed.
-
If needed, repeat this procedure to remove other cases.
Related Topics
Version: 2019.3.0
Last Modified: December 2, 2019