|
|
Important: You are reviewing the Ipro for desktop 3.0 Help. To view the latest release of Ipro for desktop Help, click here. |

Manage Batches
Manage Batches Tab Details
The Manage Batches tab of the Create/Manage Review Batches workspace presents information about the review pass and batches that have been created for a particular case. It also allows you to assign and manage batches. The following details are included on the Manage Batches tab. Scroll vertically and/or horizontally to see all details in the tab.
|
Item |
Description |
|
Batch Id |
Batches are numbered sequentially for each case (across review passes). All batches are listed on the Manage Batches tab. |
|
Batch Size |
The number of documents in each batch. |
|
Priority |
The priority of each batch (can be selected on this tab). The exact meaning of each priority should be decided for your organization and explained to reviewers. |
|
Assigned To |
The person assigned to a batch (either explicitly by the administrator or implicitly by the person selecting the batch when they log in). |
|
Last Accessed |
The date and time the reviewer last opened the batch and performed an action. |
|
Docs Reviewed |
The number of documents for which the Reviewed tag has been set in Review, indicating the review is completed. |
|
Not Reviewed |
The number of documents not started and in process. |
|
Docs on Hold |
The number of documents for which the On Hold tag has been set in Review, indicating some issue with the documents. |
|
Status |
Current condition of the batch (by default, status will change based on reviewer assignment or action; can also be selected on this tab.) |
|
Delete |
Individual batches can be deleted if needed. The documents in such batches are identified as “unbatched” and are available for new batches. |
Open Batch Management
After you have completed Create a Review Pass and Batches, get started with batch management as follows:
-
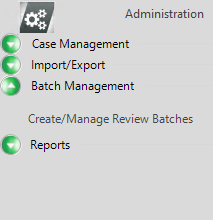
On the Dashboard, click the Administration module.

The Administration module displays.
-
In the left navigation panel, expand the Batch Management menu and click Create/Manage Review Batches.
-
In the Create/Manage Review Batches workspace, select the Client and Case for the review pass.
-
Click on an existing review pass. Alternatively, you can create a new one by clicking Create Review Pass, then selecting the new review pass in the list.

- Click the Manage Batches tab.
-
If needed, find needed batches by sorting one of the columns. Click the column heading; click the heading again to reverse the sort.


Alternatively, you can filter the batch list by a particular status by selecting the needed status in the Filter By list. For example, you might want to view/work with only batches that are unassigned.
Merge and Split Batches
It may be necessary to combine a set of batches into a single batch or to split a batch into one or more batches.
Merge batches
To merge batches:
-
Navigate to the Create/Manage Review Batches workspace and open a review pass by following the instructions listed in Open Batch Management.
-
On the Manage Batches tab, select the needed batches.
-
To select a contiguous set of batches, drag through the needed batches in the Batch Id column. Or, click the first batch and Shift+click the last batch in the set.
-
To select non-contiguous batches, click the first batch of the set and Ctrl+click additional batches.
-
-
Click Merge Batches.
-
In the Merge Batches dialog box, select the batch into which the other batches will be added. The batch ID of the selected batch will be maintained; the other batch IDs will be removed from the list in the Manage Batches tab.
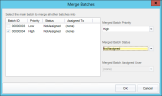
-
Select the Priority and Status for the merged batch.
-
Select the user who will be assigned to the batch. Those listed were assigned to the batches that are being merged. (If no users have been assigned, the user must be assigned after this procedure is completed.)
-
When finished, click OK.
-
If the merged batch was unassigned, assign a reviewer as explained in Assign Reviewers.

Split Batches
To split a batch:
-
Navigate to the Create/Manage Review Batches workspace and open a review pass by following the instructions listed in Open Batch Management.
-
On the Manage Batches tab, select the batch to be split.
-
Click Split Batches.
-
In the Move Batch Pages dialog box, click Unbatched, under Batch ID in the right pane of the dialog box.
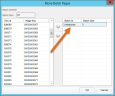
-
Identify the documents to be moved from the selected batch to a new batch(es).
-
Scroll in the documents list to see all documents.
-
Sort by document ID or image key by clicking the heading. Click again to reverse the sort.
-
-
Select the documents to be moved.
-
To select a contiguous set of documents, click the first document and Shift+click the last document in the set.
-
To select non-contiguous documents, click the first document of the set and Ctrl+click additional documents.
-
-
Click the right arrow button
 . Selected documents will be moved to the Unbatched set.
 -
Adjust the documents if needed:
-
If additional documents should be added to the new batch(es), repeat steps 6 and 7.
-
To return the unbatched documents to the existing batch, select Unbatched and click the left arrow button
 .
.
-
-
When the number of unbatched documents is correct, click OK.
-
To add the unbatched documents into new batches, click the Create Batch tab and set needed options. For details, see Create Batches.
-
Click Create Batches. New batches are created; batch IDs will be the next available numbers in the review pass.
-
Assign reviewers as explained in the following section.
-
Repeat these steps to split other batches.

|
|
NOTE: Options will apply only to unbatched documents. For example, if you select the Entire Case option, all unbatched documents in the case will be batched. If you select Image Key Range, the range must comprise unbatched documents. |

Assign Reviewers
Reviewers (as defined by the review pass) can be assigned or changed any time after review batches are created. If you change assignments after a case is started, be sure to inform the affected reviewers.
See also Change Reviewer Assignments for details on changing which groups or users are available for assignment.
Assign batches to reviewers automatically
Administration can assign reviewers to batches automatically as explained in the following procedures. In this case, selected reviewers are assigned on a rotating basis throughout selected batches.
Completely automatic assignment
By default, if you make no assignments, Administration will distribute batches to reviewers automatically when they log in and select a particular review pass.
In the following example, the administrator has made no assignments for either review pass. In Review Pass 1, Batch 2 is the next available unassigned batch; in Review Pass 2, Batch 36 is the next available batch.
Once a batch is selected and opened, it will be the only batch available to the reviewer for the associated review pass until the batch is completed.
Directed automatic assignment
In addition to completely automatic batch assignment, batches can be assigned automatically to reviewers of your choosing. To do so:
-
Navigate to the Create/Manage Review Batches workspace and open a review pass by following the instructions listed in Open Batch Management.
-
On the Manage Batches tab, select the needed batches.
-
To select a contiguous set of batches, drag through the needed batches in the Batch Id column. Or, click the first batch and Shift+click the last batch in the set.
-
To select non-contiguous batches, click the first batch of the set and Ctrl+click additional batches.
-
-
When all batches are selected, right-click one of the selected batches in the Batch Id column and select Assign Batches.
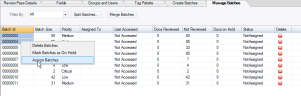
-
In the Assign Batches dialog box, select group(s) and/or user(s) to be assigned, then click OK.
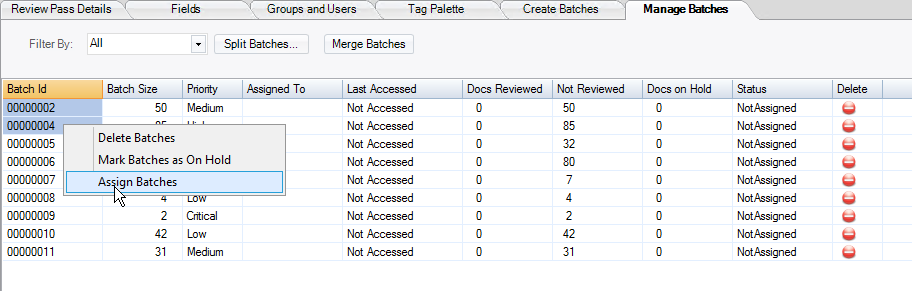
Members of selected group(s) and/or individual users who have been selected will be assigned to the batches in as even a manner as possible. For example, if you select 100 batches and assign a group with 5 members, each group member will be assigned 20 batches.
Assign a reviewer to an individual batch
To assign a reviewer to an individual batch:
-
Navigate to the Create/Manage Review Batches workspace and open a review pass by following the instructions listed in Open Batch Management.
-
On the Manage Batches tab, locate the batch you want to assign.
-
For the identified batch, click the name in the Assigned To column. A down arrow
 appears to the right of the name. Click the down arrow and select the needed reviewer.
 -
Repeat as needed to assign other reviewers to batches.
Remove a reviewer from a batch
To remove a reviewer from a batch, so that the batch status is NotAssigned:
-
Navigate to the Create/Manage Review Batches workspace and open a review pass by following the instructions listed in Open Batch Management.
-
On the Manage Batches tab, locate the batch from which you want to remove the reviewer.
-
For the identified batch, click the label in the Status column. A down arrow
 appears to the right of the name. Click the down arrow and select NotAssigned.
 -
Repeat as needed to remove other batch assignments. For more information, see Set Batch Status.
Set Batch Priority
About batch priorities
Batch priority (Low, Medium, High, and Critical) can be used to manage batches; alerts can be sent to reviewers based on priorities. The exact meaning of these priorities should be defined by your organization.
Priority can be set when batches are first created, for all batches in the review pass. Or, priority can be set for individual batches after they are created.
Procedure
To assign priority to an individual batch:
-
Navigate to the Create/Manage Review Batches workspace and open a review pass by following the instructions listed in Open Batch Management.
-
On the Manage Batches tab, locate the needed batch.
-
For the identified batch, click the field in the Priority column. A down arrow
appears to the right of the name. Click the down arrow and select the appropriate priority level (Critical, High, Medium, Low). -
Repeat as needed to assign priority to other batches.
Set Batch Status
About statuses
For any batch, the status may be as follows:
-
Assigned: A specific user is tasked to review the batch. The status is automatically set when a user is assigned. The user will have access to the batch in the order of batches assigned.
-
Closed: Review activities for the batch are complete. This status may be set when all documents have been marked as “Reviewed” or “On Hold” in a batch within Review, or by an administrator in Administration. Closed batches are not available in Review, but remain in Administration for administrative purposes.
-
In Process: A user has started reviewing the batch. This status is automatically set when a user starts working on a batch in Review, or if an administrator sets it in Administration.
-
Not Assigned: No one has been given responsibility for the batch (or an assignment has been withdrawn).
-
On Hold: Review activities need to be postponed. Placing a batch on hold stops further review activities. Any completed review activities are kept intact. Reviewers, however, cannot open a batch that is on hold.
Procedure
To assign a batch status in Administration:
-
Navigate to the Create/Manage Review Batches workspace and open a review pass by following the instructions listed in Open Batch Management.
-
On the Manage Batches tab, locate the batch for which the status should change.
-
For the identified batch, click the label in the Status column. A down arrow
appears to the right of the name. Click the down arrow and select the needed status. -
Repeat as needed to assign a status to other batches.
Deleting Batches
Batches can be deleted from a review pass. Documents from deleted batches become unbatched. They can be used to create new batches if needed.
To delete a batch(es):
-
Navigate to the Create/Manage Review Batches workspace and open a review pass by following the instructions listed in Open Batch Management.
-
To delete a single batch:
-
On the Manage Batches tab, locate the batch to be deleted.
-
For the identified batch, click
 in the Delete column.
 -
In response to the confirmation message, click OK.
-
-
To delete multiple batches:
-
On the Manage Batches tab, select the batches to be deleted.
-
To select a contiguous set of batches, drag through the needed batches in the Batch Id column. Or, click the first batch and Shift+click the last batch in the set.
-
To select non-contiguous batches, click the first batch of the set and Ctrl+click additional batches.
-
-
Right-click in the selected batches and choose Delete Batches.
-
In response to the confirmation message, click OK.
-
-
On the Review Pass Details tab, note the number of unbatched documents.
Copy the Batch List
To copy the batch list:
-
Navigate to the Create/Manage Review Batches workspace and open a review pass by following the instructions listed in Open Batch Management.
-
Click the Manage Batches tab.
-
Select the entire list or a portion of it.
-
To select the entire list, click in the list and press Ctrl+A.
-
To select a portion of the list, click the Batch Id for the first row to be included, then Shift+click the Status for the last row to be selected.
-
-
When the batches you want to copy are selected, press Ctrl+C.
-
In a text, spreadsheet, or other appropriate file, press Ctrl+V. The selected batch details are pasted in tab or column-delimited format.
Related Topics:
Version: 2019.3.0
Last Modified: December 2, 2019