|
|
Important: You are reviewing the Ipro for desktop 3.0 Help. To view the latest release of Ipro for desktop Help, click here. |

Workflow: Export and Import a Case Definition File
Applies To: Ipro for desktop
In this Article
1. Export a Case Definition File
2. Import a Case Definition File
This article provides instructions on how to export and import case definition files through the use of the Administration and Case Management modules in Ipro for desktop. For an overview of importing and exporting in the Administration module, see Overview: Import/Export .
Review the diagram below for more information on the steps taken to export and import a .CSE file.

About Case Definition Files
After you create a case, Administration allows you to export the case definition to make it easy to create future cases that share similar characteristics. The load file you create is an .XML file with a file extension of .CSE.
This file contains the following case characteristics as selected by the user, but no case data. (A case definition file can be created whether or not data has been added to the case.)
-
User-defined database field definitions (field names, types, and options)
-
Control/pick list values
-
Tag palette (tag groups and tags)
-
Redaction palette
-
Stop words
-
Key words
-
Saved searches
-
Coding forms

|
NOTE: System fields are not included in .CSE files. If a .CSE file is used to create a new case, new system fields will be created automatically. |
The following case characteristics are included in the .CSE file by default:
-
Tagging options (document/case level tagging)
-
Date format
-
History/tracking options
-
Import validation option
1. Export a Case Definition File
To export a case definition file:
-
On the Dashboard, click the Administration module.

-
Expand the Case Management drop-down menu by clicking the green arrow, then select Case Management.
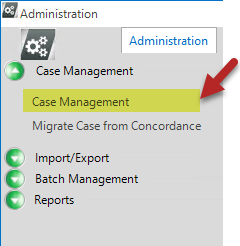
The Case Management area displays.
-
Select a Client and Case.

-
Click on the Case Details tab.
- Click the Export Definition button.
-
In the dialog box, select the items to export and click OK.
-
In the next dialog box:
-
Navigate to the location where you want to save the case definition file.
-
Enter a file name and click Save. The file extension is not required.
-
-
In response to the confirmation message, click OK. When appropriate, use the exported case definition file to create a new case as explained in Overview: Create Cases.

2. Import a Case Definition File
There are two methods for importing a case definition file. You can import the .CSE file into a new case, or choose to import the file into an existing case instead. Below are instructions on how to complete both procedures:
Import a .CSE File into a New Case
Case Management allows you to import a case definition (.CSE) file when creating a new case. This file serves as the “template” for the case. All settings defined in the .CSE file will be used for the new case. This includes:
-
Database field definitions
-
Tag and redaction palettes
-
Stop words and case options
-
Keywords
-
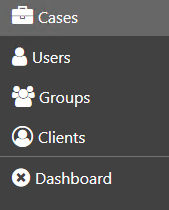
On the Dashboard, click the Case Management module.

-
In the navigation panel, click the Cases tab.
-
Click the Create Case button above the case table.

The Add Case wizard appears.
- On the Case Info step, enter all necessary details. Then click Next.
- On the Load Case Definitions page, click the Option 2 - Load from Case Definition File option.
- Click the Browse button.
- Navigate to the location where the .CSE file is stored. Click on the file and click the Open button.
- Click Next. When you finish navigating through the wizard and create your case, the settings defined in the .CSE file will apply to the new case.

Import a .CSE File into an Existing Case
If you would like to change the settings of an existing case to conform to those already defined in a .CSE file, you can do so through the Administration module. Follow the steps below to import a .CSE file into an existing case:
-
On the Dashboard, click the Administration module.
-
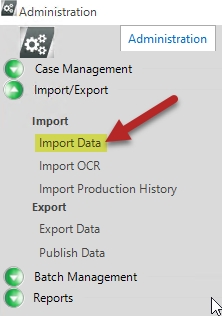
Expand the Import/Export drop-down menu by clicking the green arrow, then select Import Data.
- In the Import Data workspace, fill out the information under the Step 1. Select Source tab (including the Client ID, Case, Job Name, etc.). In the field marked Import File, click the
 button and navigate to the location on your machine where you saved the .CSE file. When you have located the file, select it and click Open.
 - Proceed through the rest of the steps in the Import Data workspace (i.e. Map Fields, View Fields, Verify), to complete the import process. For detailed instructions on how to proceed through each step, see Import Case Data. When you finish the import process, the settings defined in the .CSE file will be applied to the existing case.
Version: 2019.3.0
Last Modified: December 2, 2019