|
|
Important: You are reviewing the Ipro for desktop 3.0 Help. To view the latest release of Ipro for desktop Help, click here. |

Export Case Data
Ipro for desktop makes it easy for you for export your case data. The content of your export file will depend on the type of export you select. Before you begin, review the ![]() Export File Types table below to understand what data can be exported for different file types.
Export File Types table below to understand what data can be exported for different file types.
Get Started with Exports
After completing the previous steps, continue as follows:
-
On the Dashboard, click the Administration module.

-
In the navigation panel, expand the Import/Export menu and click the Export Data option.


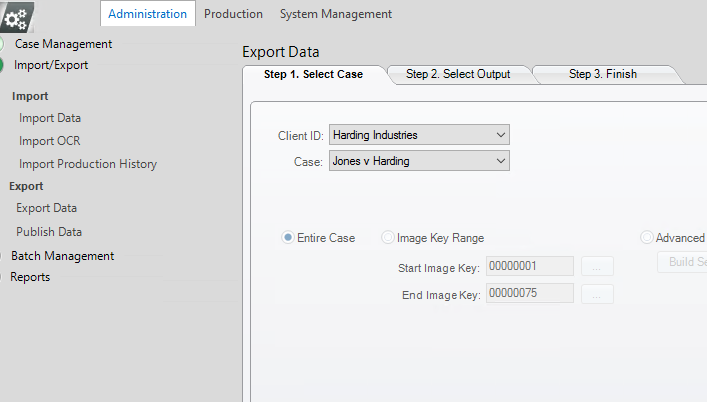
Step 1: Select Case
After completing Get Started with Exports, select the case from which data is to be exported as follows:
-
In the Export Data workspace, select the Client ID and Case to be exported. If you are exporting to a Summation .DII file, ensure that the case has a field defined as EXTRACTEDTEXT.
-
In the Export Data workspace, while still under the Select Case tab, complete one of the following steps.
Select Entire Case
-
To select all data in the case, select the Entire Case option and skip to step 8.
Select by Image Key Range
-
To select a subset of data based on image key, click the Image Key Range option, enter the starting and ending image key, then skip to step 8.
Select by Advanced Search
-
To select a subset of data based on search criteria, complete the following steps:
Click the Advanced Search option.
-
Click Build Search.
-
Complete the Advanced Search dialog box as explained in Use Advanced Search.
-
-
When the search completes, skip to step 8.
Select by Production Set
-
To select a subset of data based on the production history, click the Production History option and then click the drop down menu in order to select the existing production job you would like to export.
|
|
Production History exports can only be selected from existing production jobs for the case you are working in. Once the appropriate production job has been selected, all database fields in Step 2: Select Output, will be automatically filled in to match the selected production job. |
-
As needed, click
 to refresh the document count to match the number of documents contained in the set chosen in step 3, step 4, step 5, or step 7.
Step 2: Select Output
To select the output location and define the file types to export:
-
In the Export Data workspace, click the Step 3. Select Output tab.
-
In the Output Directory field, enter the full path for the folder in which you want the export file(s) to be placed. Alternatively, click the
 button and navigate to the needed folder in the Browse For Folder dialog box (or make a new folder in that dialog box).
 -
File Name: Optional. Enter a file name a if you want a name other than the name of the case to be used.
-
Encoding: Select the character set to be used. Common encodings are available for selection.
-
For each type of export file you want to create, complete the applicable section as explained in the following steps.
-
Concordance:
-
Select the Concordance DAT option.
-
Select ASCII or Unicode, depending on the version of Concordance file you want – version 9 and earlier or version 10 and later, respectively.
-
If needed, select different characters for the Field Delimiter, Quote Delimiter, and/or Newline (Multivalue) Delimiter.
-
-
-
Select the SummationDII and/or Summation LST option. Note that the LST option is only applicable if you specify a path for document-level OCR files in step d below.
-
For DII files, the following options are selected by default. If needed, clear one or both options.
-
@T Field: If needed image keys are defined in a field other than the BEGDOC field, select the field. (For example, new image keys defined for production might be the preferred image keys; choose the field containing the production image keys.)
-
Summation .LST: Select this option if you are exporting document-level OCR (step d) and want an .LST file. (The .LST file contains image key and path, including text file name.)
-
Document-level OCR: If your case has a field defined as EXTRACTEDTEXT, that field contains OCR data, and you want document-level OCR exported to text files (one file per document), select the Document-level option under Write OCR files to the path and enter the path to the location where the files should be created. Alternatively, click
 and navigate to the needed folder in the Browse For Folder dialog box (or make a new folder in that dialog box).
Note that if your case has an EXTRACTEDTEXT field and you do not specify a path, the document-level OCR will be included in the exported file (within an @C line for each record). -
Page-level OCR: If your case has page-level OCR and you want it exported to text files (one file per page), select Page-level and enter or navigate to the location where the files should be created.
Remove spaces...: Spaces in field names will be omitted, for example, “Doc ID,” will become “DocID.” Required if field names include spaces.
Truncate...: Field names longer than eight characters will be truncated. For example, “Document ID” will become “Document.”
-
-
CSV:
-
Select the option and select the type of Field Delimiter. This is the delimiter to be used to separate fields. For a custom delimiter, complete steps b - f. Otherwise skip to step g.
-
In the Field Delimiter list, select Custom.
-
In the Create Custom Delimiter dialog box, click the Characters or ASCII Values option, depending on how you will specify the delimiter character(s).
-
If you select Characters, enter the character(s) in the top field under the Characters option. Separate more than one character with a space. The ASCII value for each character appears in the bottom field.
-
If you select ASCII Values, enter the ASCII value(s) for the needed character(s) in the top field under the ASCII Values option. Separate more than one value with a space. The character corresponding to each value appears in the bottom field.
-
When finished, click OK.
-
If you have MULTI_VALUE fields, enter the Multivalue Delimiter character that separates the values within the field. The default delimiter is a semicolon, which is a common delimiter in email TO: and CC: fields.
-
-
Other Loadfiles: Select the other types of files you want to export.
-
Items to Export: As applicable to the type of file you are exporting, select items to be included in the file. For example, for an .LFP load file, if only the .LFP option is selected, only the IM, OI, OF lines are included in the export file. When additional items are selected (such as tags or annotations), all lines are populated (such as IS and AN lines).

Note: If you elect to include document and/or page tags in your .LFP file, exported tags will be included as “IS” lines in the .LFP file. These IS lines do not differentiate between page- and document-level tags. Thus, importing the .LFP into a different system will result in all page tags.
-
To sort data in any load files you create, select up to three fields and the sort order (ascending or descending). This may be especially useful if you base the export on a search. The following example shows that data will be sorted first by author, then by the creation date.

-
When selections are completed on the Step 2 tab, continue with Step 1: Select Case.
|
|
NOTE: If exporting to an EDRM file, note that existing case DOCKEY and BEGDOC references and naming conventions will be included in the EDRM file, regardless of your export selections. (When the EDRM option is selected for export, a warning message will remind you of this fact as you start the export.) |
Select Fields
-
When selections are completed on the Step 3 tab, continue with Step 1: Select Case.
-
In the right pane of the Step 1 tab, evaluate the list on the Database Fields tab and select the fields to be included in the export file. Note:
-
To choose all fields in the case, click the Select All option.
-
To clear all selected fields, click the Select All option.
-
Select individual fields by clicking
 next to the fields to be included.
 -
If needed, change the order of selected fields. To do so, select a field, then click the up or down arrows,
 or
or  , to move the field to the needed location. Repeat as needed to move other fields.
 -
Summation only: If you are exporting to a Summation .DII file, make sure the BEGDOC field is the first field listed and the EXTRACTEDTEXT field is the second field.
Note: If you define another field for the image key (@T field in step 7 in Step 2: Select Output, make sure it is the first field in the list.
-
If exporting page-based OCR, only the BEGDOC field needs to be selected.
-
If any selected field name includes parentheses as its first and last characters, the parentheses will be omitted in the exported case. For example, the field name
(AUTHOR)will export asAUTHOR. Field names containing parentheses within the name, such asAUTHOR(S), will include the parentheses.
NOTE: The System Field tab lists the _DOCID and _DOCTAGS fields; see About Database Fields to determine if they should be selected for export.
-
-
When selections are completed on the Step 1 tab, continue with Step 1: Select Case.
-
To sort data in any load files you create, select up to three fields and the sort order (ascending or descending). This may be especially useful if you base the export on a search. The following example shows that data will be sorted first by author, then by the creation date.
-
When selections are completed on the Step 2 tab, continue with Step 1: Select Case.
Step 3: Finish
To export the data you have specified:
-
In the Export Data workspace, click the Step 4. Finish tab.
-
Evaluate, and change if needed, the Export Block Size (default 100), which is the number of documents to be processed at one time. Factors to consider include size of the case, size of the export job, amount of content in EXTRACTED TEXT fields, system capabilities, and other factors.
-
Click Start Export. If you selected an EDRM load file for export, a warning message will display as a reminder. If this occurs, click Yes to continue, or No to stop the export and select another type of load file. (See the note in step 9 of the Select Output procedure.)
-
When the export is complete, click OK in response to the confirmation message.
-
Review the details shown on the Step 4 tab. Note that .CSE and VOLUMELIST.DLF files are always created.
-
If desired, select one of the exported files and click View File to see the contents of the file.
When exporting very large numbers of documents, the block size may need to be significantly smaller than the number of documents being exported.
Related Topics
Version: 2019.3.0
Last Modified: December 2, 2019