Attach a Synchronized Exhibit to a Transcript
You can attach a synchronized exhibit to a transcript using the Transcript Work Area. Attaching a synchronized exhibit provides the ability to automatically display the exhibit in presentation when playing the synchronized video in court. When you are working in EVIDENCE, synchronized exhibits will automatically display in the Synchronized Exhibits Preview window.
Open a Synchronized Exhibit
To attach a synchronized exhibit to a transcript, use the steps below:
-
Click the EVIDENCE tab in the left navigation panel.

-
Open the needed case by double-clicking the case name in the Cases table. Alternatively, you can select the appropriate case name, then click the Open Case button in the ribbon bar above the table.

-
Open the Transcripts Explorer.
If the Transcripts Explorer is not visible, you can open it using the Explorers dropdown in the TRIAL DIRECTOR EVIDENCE Main Menu.

Click the drop-down arrow and then click Transcripts.
By default, the Transcripts Explorer tab is found on the left of the window.
-
Select a transcript from the list.
-
Click the Open button in the ribbon bar in the Transcripts Explorer.

The transcript opens and appears in the work area.

-
Left-click the line in the transcript where you want the exhibit to display. To help find the correct location in the transcript, you can set the media to the needed time by using the playback bar beneath the multimedia player.

-
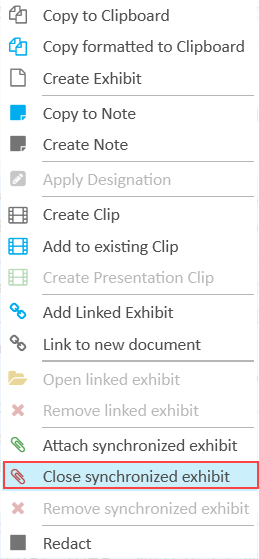
Right-click on the selected line.
-
Click the Attach synchronized exhibit button.
-
Select the exhibit to be displayed and click the Next button.
-
Select either the current line or the audio/video position as the reference point for the synchronized link. Then click the Next button.
-
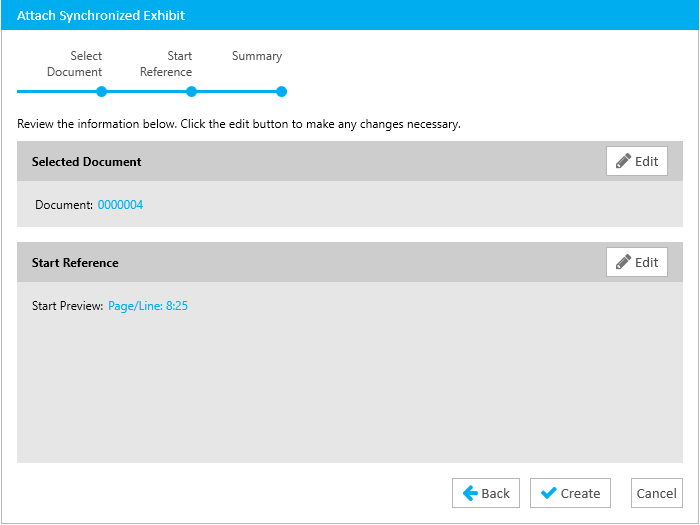
Review the summary and click the Create button.

![]()


|
Note: Synchronized Exhibits do not appear in the Exhibits folder located under each transcript in the Transcripts Explorer. They only appear as icons in the Transcript Work Area.
If you do not see the Synchronized Exhibit icon after finishing the steps above, you may need to click the Synchronized Exhibits check box in the Show Annotation area of the Transcript Work Area ribbon bar. For more information, see Work with the Transcript Work Area Ribbon Bar. |
Close a Synchronized Exhibit
To close a synchronized exhibit after it has been displayed, use the steps below:
-
Open a transcript from the Transcripts Explorer that contains a synchronized exhibit.
-
Left-click on the line in the transcript or set the media to the time where you want the exhibit to be cleared.
-
Right-click on the selected line.
-
Click the Close synchronized exhibit button.
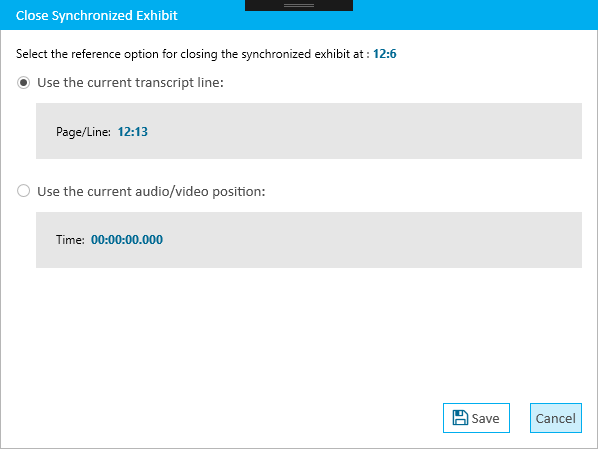
-
Select either to use the current line or the audio/video position and click the Save button.
![]()
|
|
Note: Only the Synchronized Exhibit that is directly above the close location can be closed. If you do not see the Close Synchronized Exhibit icon after finishing the steps above, you may need to click the Synchronized Exhibits check box in the Show Annotation area of the Transcript Work Area ribbon bar. For more information, see Work with the Transcript Work Area Ribbon Bar. |
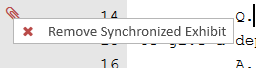
Remove a Synchronized Exhibit
To remove a Synchronized Exhibit inside the transcript, simply right-click on the icon (open or close) and click the Remove Synchronized Exhibit button.
Related Topics
Version: 2023.8.12
Last Revision: 11/8/2023