
Configure Single Sign-on (SSO)
Administrators can configure OPEN DISCOVERY to use an external identity provider for Single Sign-on (SSO). If SSO has been configured, users are able to sign in to OPEN DISCOVERY through the third-party identity provider, rather than having to use IPRO-specific login credentials. This removes some of the burdens for users who have to remember multiple login credentials, as well as for administrators who have to manage user security across applications. IPRO supports any 3rd party identity provider that uses OpenID Connect. Popular providers include:
- Microsoft
- Okta
- Ping
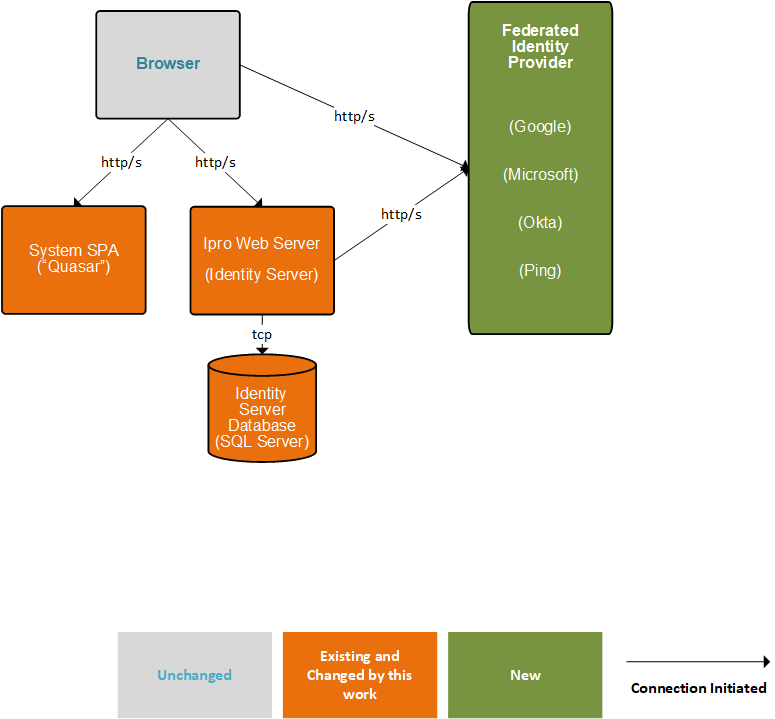
Identity Provider Diagram
The external identity provider block diagram is as follows:
This topic provides instructions on how to configure a new identity provider for SSO, as well as how to modify your configuration at a later date. For answers to common questions related to SSO, see FAQ: Single Sign-on and Multi-Factor Authentication.
Add a New Identity Provider
Administrators can configure SSO integration in the System Manager. Follow the instructions below to set up the SSO integration:
|
|
Note: You can only set up one external identity provider per environment. |
- Click the Settings icon
 in the top-right corner of the screen. The Settings icon is a global button that displays in every module of the OPEN DISCOVERY platform.
 -
The System Manager opens. In the left pane of the System Manager, click Security Settings.


-
Select the Add New Provider button to the right of Single Sign On.

-
In the window that displays, configure the fields and select the needed options to set up the integration with the identity provider. For more information on the fields and options available, click
 here.
here. - When you've finished defining the information for the new provider, select Save. The identity provider's information appears beneath the Single Sign On option on the Environment Settings Page.
-
Having configured your identity provider, you now have the ability to enable your users to log in with the new provider. There are two methods you can use to accomplish this:
- To enable only certain users, see Enable Select Users for SSO.
- To enable all users, see Enable All Users for SSO.


Enable Select Users for SSO
If you would like only certain users to sign in with the external identity provider, you can enable them manually in the System Manager. Be advised that users enabled for SSO can no longer sign in with their IPRO credentials. To enable individual users, follow the steps below:
- Ensure that an external identity provider has been configured in OPEN DISCOVERY. See Add a New Identity Provider for more information on this step.
-
Navigate to the Users tab in the System Manager. If the System Manager is not already open, you can open it by selecting the Settings icon
in the top-right corner of the screen. In the left pane of the System Manager, ensure the Users tab is selected.
- From the list of users, locate the one you would like to enable for SSO. Click on their name. The user profile opens on the right side of the screen.
-
Click the Edit icon
 . The user profile can now be modified.
 - Select the Use External Identity Provider slider. An orange slider means the option has been set.
- Click Save in the top-right corner of the screen. Repeat these steps for any additional users that need to be enabled for SSO.

Enable All Users for SSO
If you would like all users in your system to sign in with the external identity provider, you can bulk convert all users simultaneously. Be advised that users enabled for SSO can no longer sign in with their IPRO credentials. Review the instructions below for steps on how to bulk convert your users:
- Ensure that an external identity provider has been configured in OPEN DISCOVERY. See Add a New Identity Provider for more information on this step.
-
Navigate to the Security Settings tab in the System Manager. From this page, select the Migrate Users button to the right of Single Sign On.

-
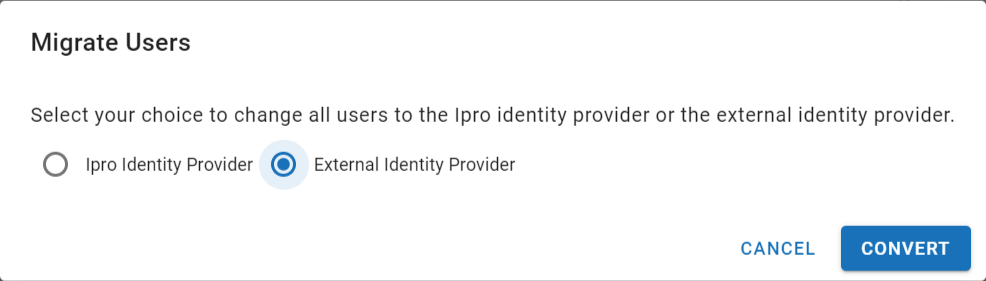
The Migrate Users dialog displays. To bulk convert all users to the new provider, select the External Identity Provider option.
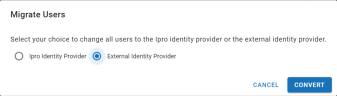
-
Click Convert. A pop-up window appears listing the number of users successfully converted, as well as the number who failed to convert. The names of any users who failed to convert, as well as the reason for why they could not be converted, are also listed in this window.

Note: The main reason a user would fail to convert is if the account's username isn't an email address; in order to map users from an external provider, the username must match the username (email address) associated with the external provider. This error can be resolved by editing the user account so that the username is the associated email address. After this is resolved, the specifically affected account can be individually made an external account. For instructions on how to edit a user, see Modify User Details.

Modify the Configuration of an Identity Provider
You can change the configuration of an external identity provider at any time. For instructions on how to accomplish this, follow the steps below:
-
Click the Settings icon
in the top-right corner of the screeen. The Settings icon is a global button that displays in every module of the OPEN DISCOVERY platform. -
The System Manager opens. In the left pane of the System Manager, click Security Settings.
-
Select the
 icon to the right of the identity provider's name.
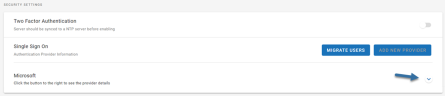
- The configuration for the provider expands below the name. To edit the configuration, select Edit Provider at the bottom of the screen.
-
In the window that displays, modify any fields as needed to properly configure the integration with the identity provider. For more information on the fields and options available, click
here. - When you've finished modifying the information for the identity provider, select Save.

Delete an Identity Provider
If you would like to delete an identity provider, see the following instructions:
-
Click the Settings icon
in the top-right corner of the screeen. The Settings icon is a global button that displays in every module of the OPEN DISCOVERY platform. -
The System Manager opens. In the left pane of the System Manager, click Security Settings.
-
Select the
icon to the right of the identity provider's name.
- The configuration for the provider expands below the name. To remove the provider from the system, select Delete Provider at the bottom of the screen.
- A warning message displays, indicating that the provider will be permanently deleted. To proceed with the removal, select Yes.
Related Topics