
Monitor Job Manager Agents
You can monitor the status of Job Manager agents in your environment to ensure that agents are online and accepting tasks. The Agents tab in the Job Manager provides details about the status of each agent, and can be useful for troubleshooting any issues that may arise when processing tasks in the Job Manager. To view Job Manager agents configured in your environment, navigate to the Job Manager by proceeding through the steps described in Open the Job Manager.
With the Job Manager open, click the Agents tab at the top of the page. All Job Manager agents appear in a grid.

The Agent Status table displays information about each agent, including:
- Name
- Worker Version
- Status
- Start Time
- Active Tasks
Review the table below to learn more about each column:
|
Column |
Definition |
||
|---|---|---|---|
|
Name |
The name of the Job Manager agent. |
||
|
Worker Version |
The version the agent is currently running. Note: if an agent has not been updated to the same version as others configured in your system, the agent's status may report Unresponsive. When this happens, the agent cannot accept tasks for any jobs that have been submitted to the Job Manager. When the agent is updated to the correct version, the status changes to Online, and the agent can begin processing tasks. |
||
|
Status |
This columns reports the current status for each Job Manager agent. Status types include:
|
||
|
Start Time |
For Job Manager agents with an Online status, the Start Time column indicates the date and time when the agent was turned on. |
||
|
Active Tasks |
This column shows the number of tasks the agent is currently processing, compared to the total number of tasks the agent can handle at one time. For instance, if the value in this column is 10/20, the agent is currently processing 10 tasks, out of a total of 20 tasks that the agent could be processing. |

Download Agent Status
To download a .json file that contains a further breakdown of the full list of agents and their status, click the Download Agent Status button.

|
|
Note: To access the downloaded file, ensure that you have a text editor installed on your machine that can open .json files. |

Configure Agent Priority Setting
|
|
Note: This functionality is only available for users who belong to the SuperAdmin group. |
The priority status of a job determines the order in which it gets picked up for processing by an available Job Manager Agent. A job with a Critical priority status takes precedence over a job with a High priority, which in turn is processed before a job with a Normal priority. This system ensures that the most crucial jobs are worked on first. For a list of job types and their priority levels, click ![]() here.
here.
To prevent Normal priority jobs from being completely starved while the system processes higher priority jobs, you have the ability to dedicate a set percentage of agent bandwidth to process jobs with a Normal priority status. For instance, let's say you dedicate 20% of Job Manager resources to Normal priority jobs. If the system is fully occupied with Critical or High priority jobs, and you submit a job with a Normal priority status, 20% of Job Manager tasks will be diverted to work on the Normal priority job that you submitted.
|
|
Note: The percentage of resources you dedicate for Normal priority jobs only applies when a Normal job is available for processing. If there are only Critical and High priority jobs available, the system automatically dedicates 100% of its resources to processing these jobs. |
To determine the Agent Priority percentage, follow the steps below:
-
Open the Job Manager. See Overview: Job Manager for more information on how to complete this step.
-
With the Job Manager open, click the Agents tab at the top of the page. All Job Manager agents appear in a grid.

-
Click the Agent Priority Setting button.
-
In the popup that appears, select the desired priority percentage for processing Normal priority jobs.
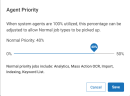
-
With the desired percentage selected, click Save to save your changes and close the dialog box.

Related Topics