Create a Processed Data Export Job
You can deliver a Processing Job to a client by exporting it. The Process Export uses a wizard to facilitate the exporting one or more Processing Jobs.
|
|
Note: We recommend that you QC the Processing Job(s) before it is exported to ensure data accuracy. The system will display a message if it encounters processing jobs that have not yet been QCed. |
-
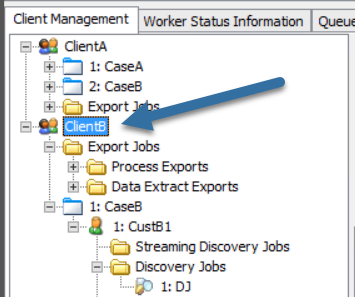
Click the Client Management tab.
-
Do one of the following:
-
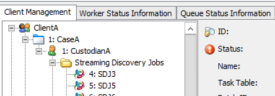
In Tree View, under the Custodian:
- Navigate to Processing Jobs.
-
Right-click a completed Processing Job, and select Export Processed Data on the context menu.
-
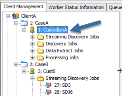
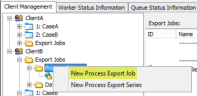
In Tree View, under the Client:
- Navigate to Export Jobs.
-
Right-click Process Exports and select New Process Export Job on the context menu.
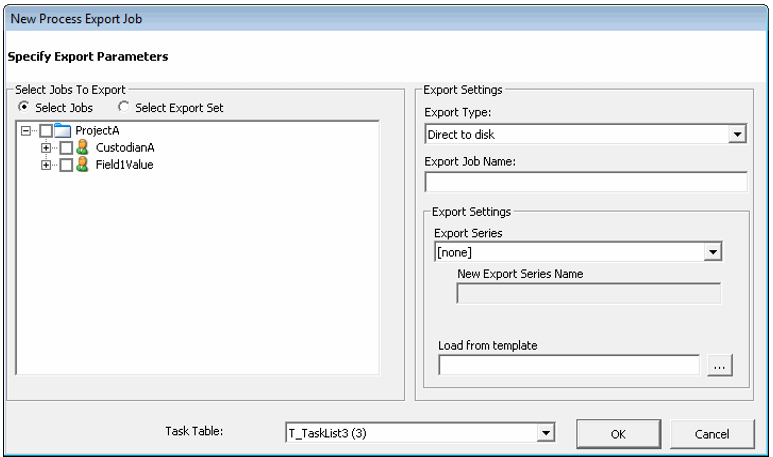
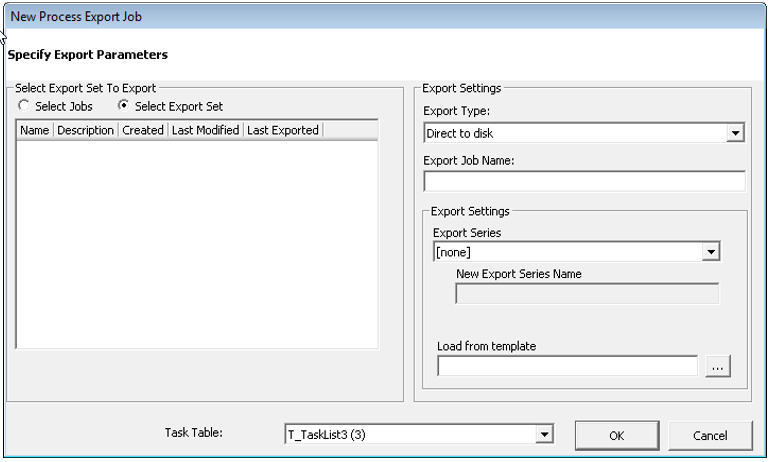
The Specify Export Parameters dialog box appears. The selected Job is already selected in Tree View. Select additional options, as outlined in the remaining steps of the procedure.
The Specify Export Parameters dialog box appears.
-
-
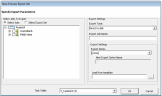
In the Specify Export Parameters dialog box, do one of the following under Select Jobs to Export:
If you want to select jobs to export:
-
Choose Select Jobs to display the list of jobs available for export.
-
Expand the Tree View and select one or more Jobs for exporting. The Export Job Name field populates with the first Processing Job you selected. You can select multiple Processing Jobs for export. The system goes through each one and stores the data under the directory of the Export Job Name you indicated in the Specify Export Parameters dialog box. It may be necessary to expand the Tree View to see the Processing Jobs.
-
Choose Select Export Set to display a list of export sets that were created in QC.
- Expand the Tree View and select one export set for export. If necessary, expand any Export Set Containers to select an export set that is stored in a container.
- Under Export Settings, on the Export Type drop-down menu, select Direct to Disk.
-
Under Export Settings, in the Export Job Name field, enter an Export Job name. If a default name displays in the field, modify it as necessary. This is the name the system uses as the directory name where the exported data is stored.
-
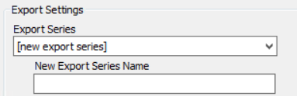
(Optional) Under Export Settings, open the Export Series drop down menu and do one of the following on the menu:

-
Leave the default setting ([none]).
-
Select an Export Series. See Overview: Export Series for background information about Export Series. Or see Create an Export Series if you want to create the Export Series before the Export Job is created.

Note: When an existing Export Series is selected, the
 button appears. If you click the button, the Export settings dialog boxes do not appear; instead the Job is placed in the Job Queue. If you do not click, the Export settings wizard displays allowing you to set the Export settings and then run the Export Job.
 -
Select [new export series] and enter a New Export Series Name.
-
-
(Optional) Click the Load from Template browse button, and navigate to the ExportSettings.INI template file that has the processing export settings from a previously run data extraction export. A file will not exist until you run your first processing export.

Note: This option is not available if you selected an Export Series on the drop-down menu. The ExportSettings.INI file saves time by not requiring you to manually make selections in some of the Export wizard screens.The file also ensures that there is consistency when exporting Jobs for a particular situation.
-
Select Task Table on the drop-down menu. The task table that displays in the field is based on the last task table selected for the Client.

-
Click OK. The Select Export Formats and File Handling Options dialog box appears.
Note: A warning dialog box may display if one or more of the selected processing jobs have not yet passed QC. You can choose to continue with the export; or cancel, QC the jobs, and then export again.
-
Complete the Select Export Formats and File Handling Options dialog box by selecting the required options.

For more information about the various options, click the following to expand:


If you want to select Export Sets to export:


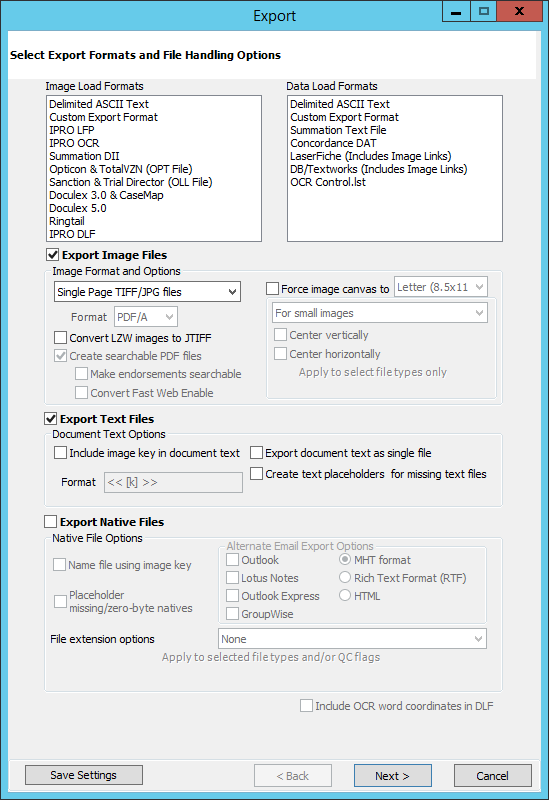


Click ![]() to proceed to the next step in the wizard. Some steps in the wizard may or may not display, depending on the Data Load Formats you selected.
to proceed to the next step in the wizard. Some steps in the wizard may or may not display, depending on the Data Load Formats you selected.
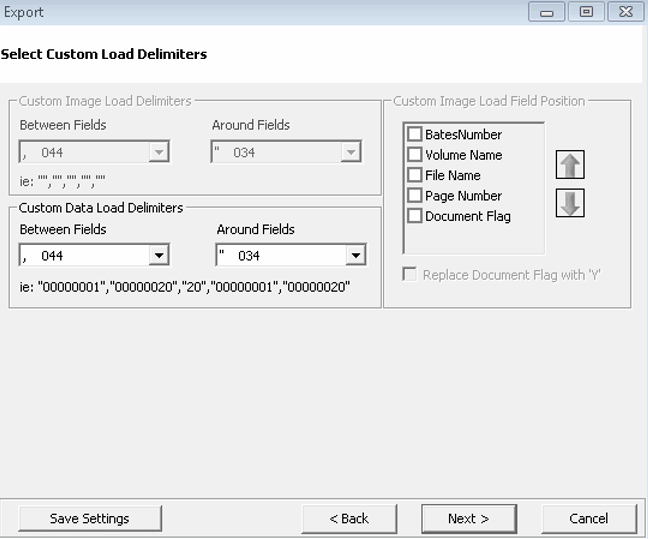
If you selected Custom Export Format as a Data Load Format in the Select Export Formats and File Handling Options dialog box, the Select Custom Load Delimiters dialog box displays in the wizard.
For information about populating this dialog box, click the following to expand
The Load Formats selected in the Select Export Formats and File Handling Options dialog box affect the options you can or cannot select in the Select Custom Load Delimiters dialog box.
-
Custom Image Load Delimiters: Select a Between Fields delimiter on the drop-down menu and an Around Fields delimiter on the drop-down menu.
The delimiter drop-down menus show the ASCII character number and a picture of the character to help you select the correct delimiters.
-
Custom Image Load Field Position: Select the entire field you want to reposition and then click either
 or
or  to move it. Repeat for additional fields. Ensure that the fields you want
to include are selected.
to move it. Repeat for additional fields. Ensure that the fields you want
to include are selected. -
If you want a “Y” to indicate a document boundary in the load file, select the option Replace document flag with “Y”.
-
Custom Data Load Delimiters: Select a Between Fields delimiter on the drop-down menu and an Around Fields delimiter on the drop-down menu.
The delimiter drop-down menus show the ASCII character number and a picture of the character to help you select the correct delimiters.
When finished, click ![]() .
.
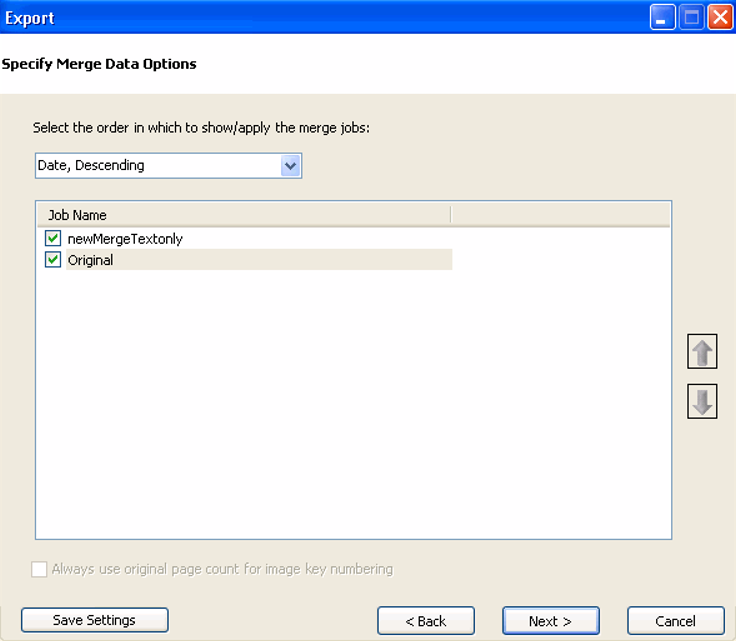
If at least one set of text exists in one of the Data Extract jobs or Export Sets selected for the Export job, the Specify Merge Data Options dialog box appears.
For information about completing this step, click the following to expand:
Do the following:
- On the drop-down menu, select the order in which merge jobs display in the Merge Jobs drop-down menu in the Image tab or View tab (Date, Ascending; Date,Descending (default); Name, Ascending; Name, Descending; Custom - use the up/down arrows).
- Clear one or more merge jobs. By default, all merge jobs are selected. The "Original" item refers to the original images and text associated with the document. It displays as the last item in the list of merge jobs and remains selected.
- (Optional) Select the option Always use original page count for image key numbering. This is relevant for Process Exports. This option affects how image keys are assigned to pages when exported and could affect how many images are exported. When this option is selected, it uses the original page count for the document. Otherwise, it uses the total page count of the applicable merge job.
When finished, click ![]() .
.
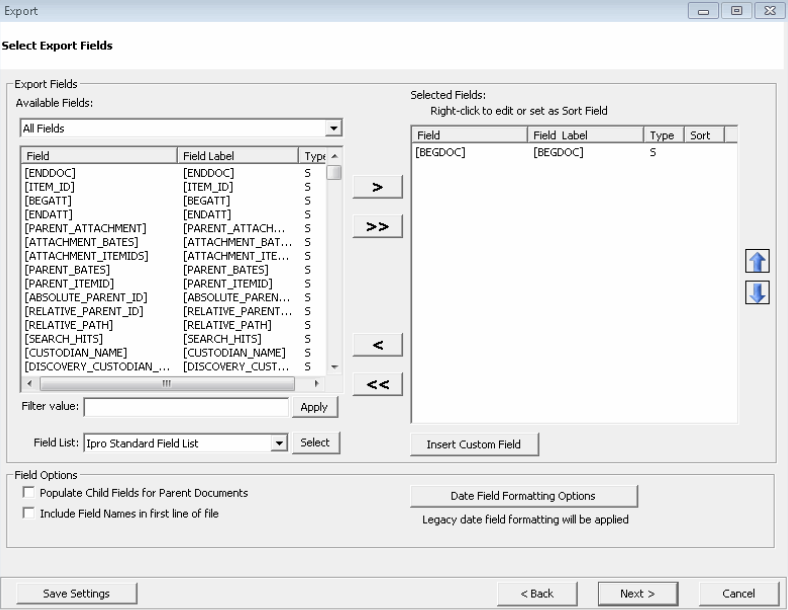
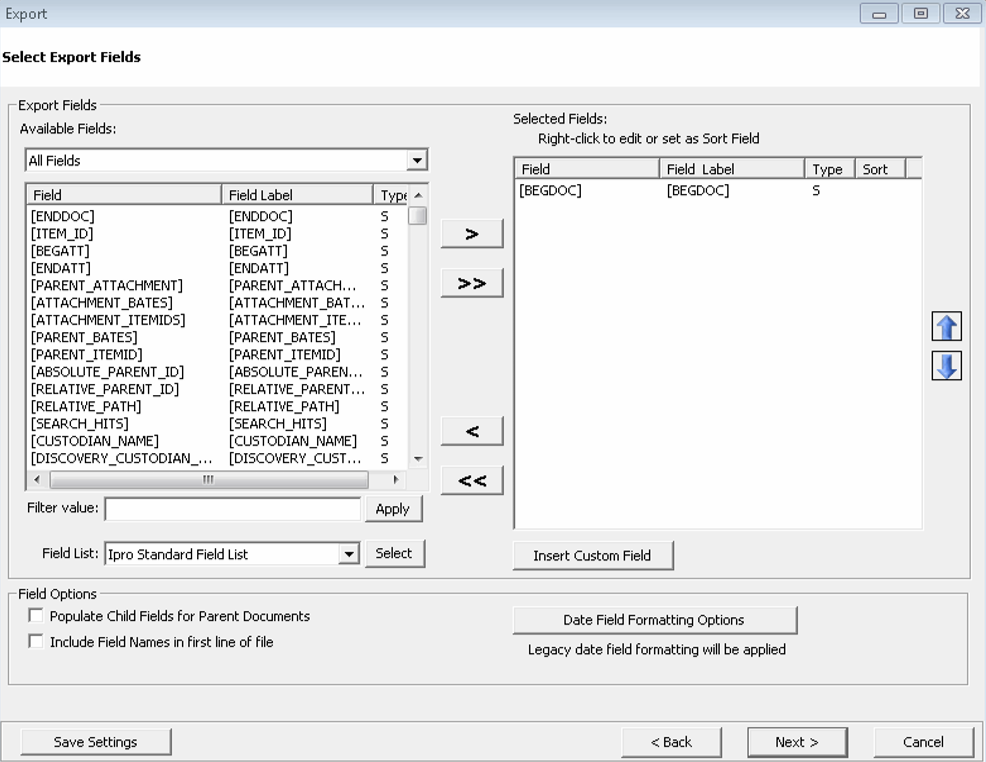
The Select Export Fields dialog box appears.
For information about completing this step, click the following to expand:
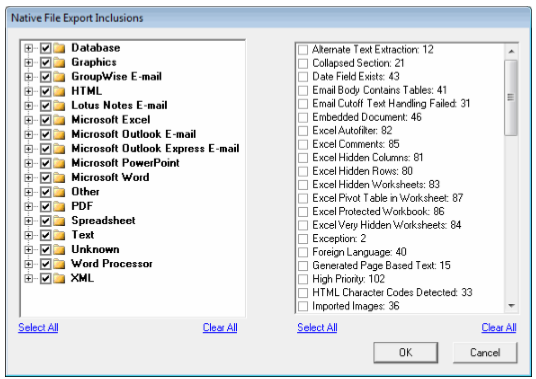
![]() Define Export Fields for Databases
Define Export Fields for Databases

![]() Select
Options in the Select Export Fields Dialog Box
Select
Options in the Select Export Fields Dialog Box

 to display
the File Browser dialog box. Browse to a location, enter a file name,
and click Open. The Save Template As dialog box displays and indicates
the path name in the Location field. Click Save.
to display
the File Browser dialog box. Browse to a location, enter a file name,
and click Open. The Save Template As dialog box displays and indicates
the path name in the Location field. Click Save.
When finished, click ![]() .
.
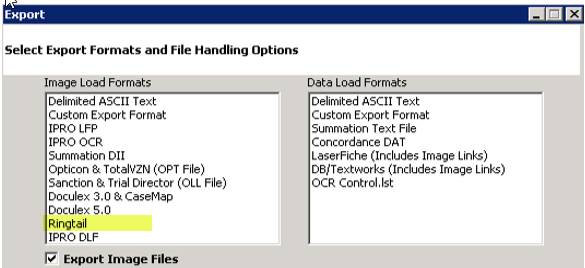
If you selected Ringtail as a Data Load Format in step 10, the Assign Export_Extras Field Types for Ringtail dialog box displays in the wizard.

Click the following for information about populating the Assign Export_Extras Field Types for Ringtail dialog box.

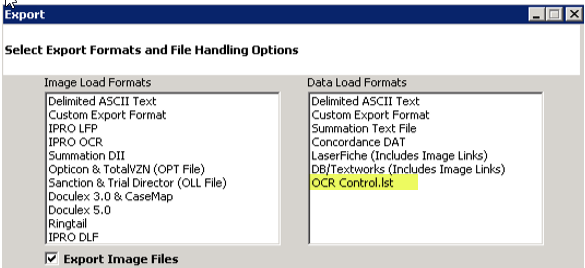
If you selected Summation DII as an Image Load Format or Data Load Format, the Specify Summation Options dialog box appears.

Click the following for information about populating the Specify Summation Options dialog box:
When finished, click ![]() .
.
Click  . The Specify
Endorsements dialog box appears.
. The Specify
Endorsements dialog box appears.
Click the following for information about populating this dialog box:
-
Select Endorsement Zone. The zone displays a thick border to indicate it is the active zone.
-
On the drop-down menu located above the Available Fields list box, select a specific field type (System [S], Flags [F], Metadata [M], and User Defined fields [U and G] ). By default, All Fields displays. To further narrow the field list, enter a value in the Filter Value field located below the Available Fields list box. For example, to see only those fields that contain the word date, enter date and click
 . To display all fields, delete the value, leaving the field blank,
and click .
. To display all fields, delete the value, leaving the field blank,
and click . -
In the Available Fields list box, double-click a single field (or select a single field in the list) and click
 to move the field to the Selected Fields list box and place it in
the selected Endorsement Zone at the same time. Once a field has
been selected for placement in a zone, it cannot display in a different
zone. A total of three fields may occupy a single zone. If a zone
is to contain more than one field, use the
or to change the order
of the fields in the Selected Fields list box in the active Endorsement
Zone. Each field displays in its own line in the Endorsement Zone.
to move the field to the Selected Fields list box and place it in
the selected Endorsement Zone at the same time. Once a field has
been selected for placement in a zone, it cannot display in a different
zone. A total of three fields may occupy a single zone. If a zone
is to contain more than one field, use the
or to change the order
of the fields in the Selected Fields list box in the active Endorsement
Zone. Each field displays in its own line in the Endorsement Zone.
Note: When exporting a barcode, message text, and image key; and the image key contains underscore delimiters, eCapture displays a warning: Lowercase characters and underscores cannot be combined with barcode endorsement.
-
To remove a field from an Endorsement Zone, select the Endorsement Zone, select the field in the Selected Fields list box, and click
 .
. -
To change the appearance (attributes) of a field in the Endorsement Zone, do the following: Select the Endorsement Zone, select the field in the Selected Fields list box, and click
 to open the
Font box. Select a Font, Font Style, Size, Effects (Strikeout,
Underline), and Color. Click OK to close the Font box. Repeat
for additional endorsement fields.
to open the
Font box. Select a Font, Font Style, Size, Effects (Strikeout,
Underline), and Color. Click OK to close the Font box. Repeat
for additional endorsement fields. -
To insert custom fields, click
 .
See Insert Custom Group Fields and Inserting Custom User Field Labels to
add custom group and/or custom user fields for endorsement.
.
See Insert Custom Group Fields and Inserting Custom User Field Labels to
add custom group and/or custom user fields for endorsement. - Select the Enable High Quality Endorsements option to ensure the resultant image displays the revision strike through lines and other fine detail when track revisions are enabled for the document. However, when this option is selected, performance may be impacted due to the image being resized and then combined with the endorsed image to produce one completed image.
-
To preview the Endorsement Zones and the fields assigned to those Endorsement Zones , click
 . The Endorsement Sample Data
dialog box displays and shows the Zone, Type, Field Label, and Field Value,
if any, in a grid format. To preview a sample of the Endorsement Zones
and fields on an image, click .
. The Endorsement Sample Data
dialog box displays and shows the Zone, Type, Field Label, and Field Value,
if any, in a grid format. To preview a sample of the Endorsement Zones
and fields on an image, click . The Endorsement
Sample Image Preview dialog box displays and shows the selected fields in their
endorsement zones. Use the first three icons in the toolbar to adjust
how the image displays for viewing: Fit Normal, Fit Horizontally, and Best
Fit. The Magnify Glass icons are used to Zoom In and Zoom Out respectively.
The Percentage values in the drop-down menu can also be used to Zoom In or
Zoom Out. The Sample can be saved if required.
The Endorsement
Sample Image Preview dialog box displays and shows the selected fields in their
endorsement zones. Use the first three icons in the toolbar to adjust
how the image displays for viewing: Fit Normal, Fit Horizontally, and Best
Fit. The Magnify Glass icons are used to Zoom In and Zoom Out respectively.
The Percentage values in the drop-down menu can also be used to Zoom In or
Zoom Out. The Sample can be saved if required.
When finished, click . The Specify export directory and file options dialog box appears.
This is the final screen in the Export process.

Click the following for more information about populating the Specify export directory and file options dialog box.
 to change it.
(Optional)
Click ![]() to save the export settings
to an .INI file. For more information, see Save Export Settings.
to save the export settings
to an .INI file. For more information, see Save Export Settings.
If this is for a Process Export Job, it will display in the eCapture Controller’s Job Queue. Start the Process Export Job. The Job details are available by selecting the job in the Tree View. (Under Export Jobs, Process Exports). The Data Panel has two buttons: View Settings and View Output. Click View Settings to display information about the Job. Click View Output to access the files that were created through the Explorer.
Related Topics