Edit Workbook Item Properties
Once items have been added to a workbook, you can view and/or edit properties for various workbook item types. You can modify properties for the following workbook items:
-
Workbook Properties
-
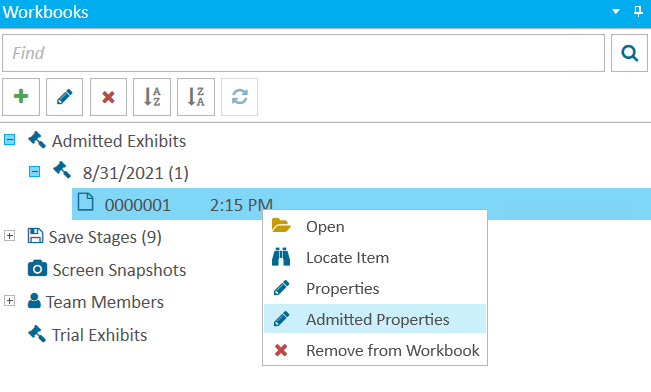
Admitted Item Workbook Properties
-
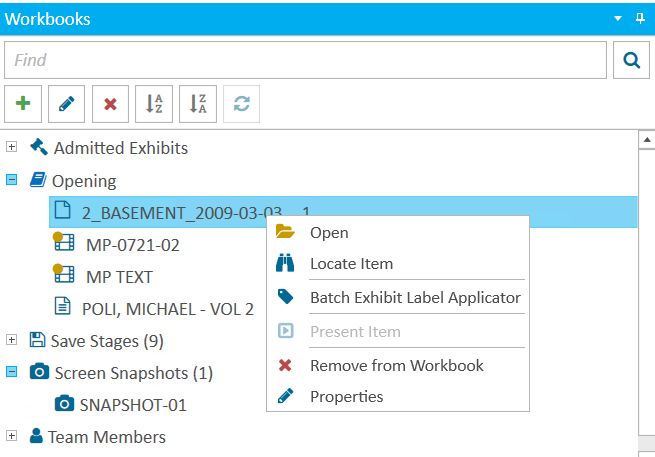
Workbook Page Properties
-
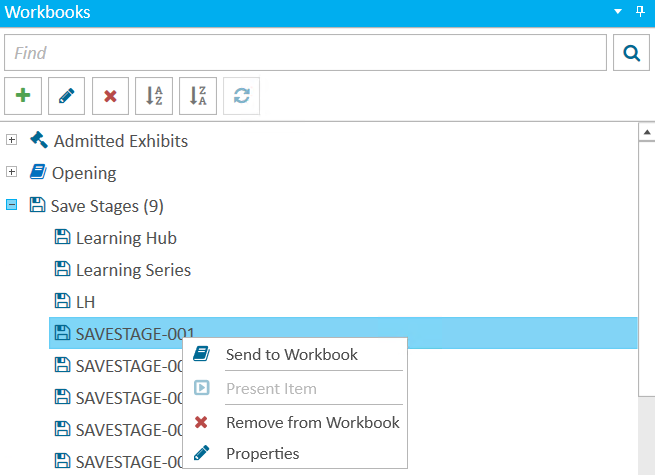
Workbook Save Stage Properties
-
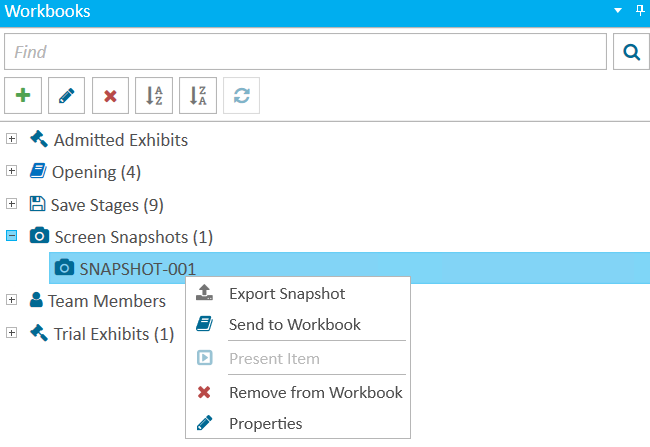
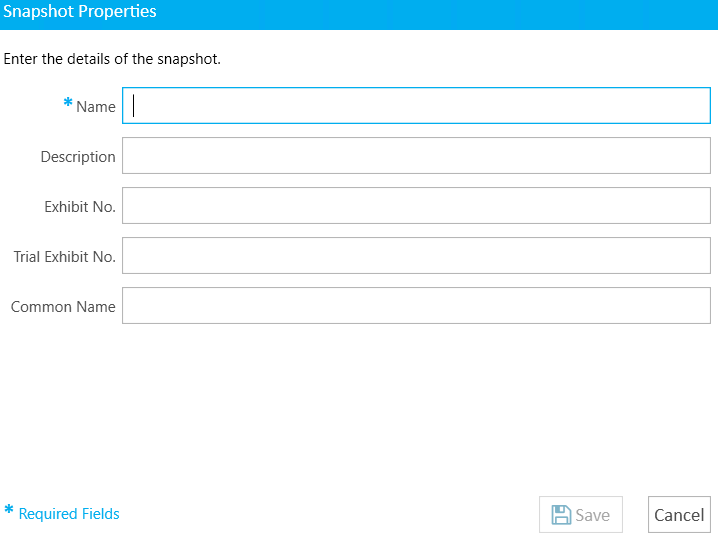
Workbook Snapshot Properties
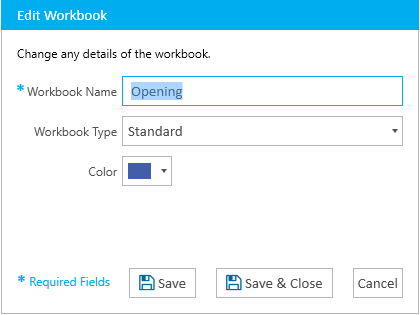
You can change the name, type and color for a workbook. To edit workbook properties follow the steps below:
-
From the dashboard, click the Presentation module.
-
Click the EVIDENCE tab in the left navigation panel.
-
Open the needed case by double-clicking the case name in the Cases table. Alternatively, you can select the appropriate case name, then click the Open Case button in the ribbon bar above the table.
-
Open the Workbooks Explorer.
If the explorer is hidden, you can use the Explorers dropdown in the Main Menu to view it.
-
Right-click on the name of the workbook you would like to work on and click Properties.
The Edit Workbook dialog box appears.
-
Make any necessary changes to the properties.
-
Click the Save button.
The updated properties are saved.
You can modify page properties such as the page Id., description, exhibit numbers, and more for documents in a workbook. To edit workbook page properties, follow the steps below:
-
From the dashboard, click the Presentation module.
-
Click the EVIDENCE tab in the left navigation panel.
-
Open the needed case by double-clicking the case name in the Cases table. Alternatively, you can select the appropriate case name, then click the Open Case button in the ribbon bar above the table.
-
Open the Workbooks Explorer.
If the explorer is hidden, you can use the Explorers dropdown in the Main Menu to view it.
-
Right-click on the name of the document you would like to work on and click Properties.
The Page Properties dialog box appears.
-
Make any necessary changes to the properties.
-
Click the Save button.
The updated properties are saved.
You can modify the party, witness and the admitted time and date for admitted items in a workbook. To edit admitted items in a workbook follow the steps below:
-
From the dashboard, click the Presentation module.
-
Click the EVIDENCE tab in the left navigation panel.
-
Open the needed case by double-clicking the case name in the Cases table. Alternatively, you can select the appropriate case name, then click the Open Case button in the ribbon bar above the table.
-
Open the Workbooks Explorer.
If the explorer is hidden, you can use the Explorers dropdown in the Main Menu to view it.
-
In the Admitted Exhibits workbook, right-click on the name of the admitted item you would like to work on.
Click the Admitted Properties button.
The Admitted Properties dialog box appears.
-
Make any necessary changes to the properties.
-
Click the Save button.
The updated properties are saved.
You are can rename and add a description to a Save Stage. To edit save stage workbook properties, follow the steps below:
-
From the dashboard, click the Presentation module.
-
Click the EVIDENCE tab in the left navigation panel.
-
Open the needed case by double-clicking the case name in the Cases table. Alternatively, you can select the appropriate case name, then click the Open Case button in the ribbon bar above the table.
-
Open the Workbooks Explorer.
If the explorer is hidden, you can use the Explorers dropdown in the Main Menu to view it.
-
Right-click the Save Stage that you want to edit.
The Save Stage Properties window appears.
-
Make any necessary changes to the properties.
-
Click the Save button.
The updated properties are saved.
You can rename and add a description to a Screen Snapshot. To edit screen snapshot properties, follow the steps below:
-
From the dashboard, click the Presentation module.
-
Click the EVIDENCE tab in the left navigation panel.
-
Open the needed case by double-clicking the case name in the Cases table. Alternatively, you can select the appropriate case name, then click the Open Case button in the ribbon bar above the table.
-
Open the Workbooks Explorer.
If the explorer is hidden, you can use the Explorers dropdown in the Main Menu to view it.
-
Right-click the Screen Snapshot that you want to edit.
The Screen Snapshot Properties window displays.
-
Make any necessary changes to the properties.
-
Click the Save button.
The updated properties are saved.
Related Topics
Overview: Workbooks
Add Items to a Workbook