Edit a Clip Segment
You can edit an existing clip segment by changing the start/end segment time, removing content within a segment or removing content before or after a specific location in a segment, using the steps described below in this article.
To open the Clips Work Area:
-
From the dashboard, click the Presentation module.

-
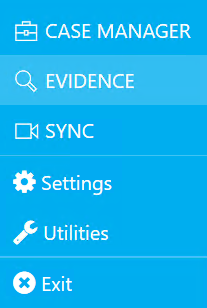
Click the EVIDENCE tab in the left navigation panel.

-
Open the needed case by double-clicking the case name in the Cases table. Alternatively, you can select the appropriate case name, then click the Open Case button in the ribbon bar above the table.

-
Open the Clips Explorer.
If the Clips Explorer is not visible, you can open it using the Explorers dropdown in the top-right corner of the screen.

Click the drop-down arrow and then click Clips.
- From the Clips Explorer, right-click the clip you would like to modify.
- The right-click context menu appears. Click Open Clip. The clip opens in the Clips Work Area.


Manually Set Clip Start and Stop Time
The Clip Segments area shows the segments included in the clip. By selecting a segment, options to manage or manipulate the segment become active. You can modify when a clip begins or ends by manually updating the PG:LN Begin and PG:LN End values, or the Punch In and Punch Out times directly in the Clip Segments area.
-
To change the start time:
-
Click into the PG:LN Begin cell and type the page and line reference for the location in the transcript where you would like the clip to begin. The clip begins playing at the start of the line specified. Alternatively, click into the Punch In cell and manually type the needed start time for the current segment.

- Click Enter on your keyboard to input the new value.
- If necessary, make adjustments to the clip end time, as described in the following step.
- When finished, click the Save button near the top-left corner of the Clips Work Area.
-
-
To change the end time:
-
Click into the PG:LN End cell and type the page and line reference for the location in the transcript where you would like the clip to end. The clip stops playing at the end of the line specified. Alternatively, click in the Punch Out cell and manually type the needed end time for the current segment.

Note: When you modify the clip Punch In and Punch Out time, the format for the time stamp must be hours:minutes:seconds:milliseconds, for example:

- Click Enter on your keyboard to input the new value.
- When finished, click the Save button near the top-left corner of the Clips Work Area.
-

Edit Clip Segment Using the Waveform Editor
You can edit the clip segment using the Waveform editor. In the editor, solid color "waves" indicate the occurrence of speaking or noises. Blank spaces indicate silence. The following image describes the Waveform editor and how to use the editor.
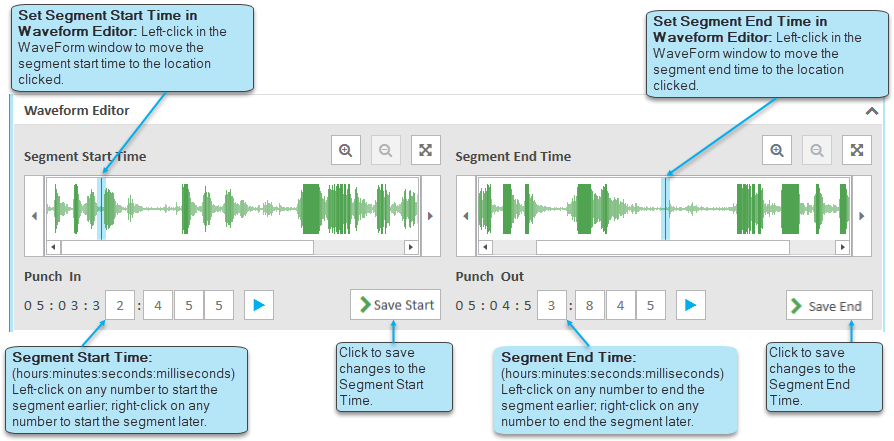
- Change the start time in the Waveform window:
- Left-click in the Waveform window to move the segment start time to the location clicked. The red guide bar indicates the start time. The Punch In time changes to the time stamp for the location indicated by the guide bar.
- Click
 to save changes to the start time for the selected segment.
-
Change the end time in the Waveform window:
- Left-click in the Waveform window to move the segment end time to the location clicked. The red guide bar indicates the end time. the Punch Out time changes to the time stamp for the location indicated by the guide bar.
- Click
 to save changes to the end time for the selected segment.
- To change the start time for the segment using the Punch In time stamp:
Left-click on any number to start the segment earlier; right-click on any number to start the segment later.
- Click to save changes to the start time for the selected segment.
- To change the end time for the segment using the Punch Out timestamp.
- Left-click on any number to end the segment earlier; right-click on any number to end the segment later.
- Click to save changes to the end time
Remove Content Within a Segment
You can select one or more words/lines within a clip segment and remove the selected content. When you do this, new segments are created, one with the transcript content before the selection and one with the transcript content after the selection.
-
In the Clips Work Area, click on the Transcript Preview button.
-
In the Transcript Preview window, select one or more words and then right-click and select Remove from segment.
-
In the Clips Work Area, click on the Options button and then click Save.
![]()


Two segments are created and appear under their respective clip in the Transcripts Explorer as well as in the Clips Explorer.
Remove Text Before or Remove Text After
You can click on a location within a clip segment and select the Remove text before or Remove text after option. When you select Remove text before the segment is modified, removing any transcript text before the cursor location. When you select Remove text after, the segment is modified, removing any transcript text after the cursor location.
-
In the Clips Work Area, click on the Transcript Preview button.
-
In the Transcript Preview window, left-click in the location where you want the change to take place.
-
Right-click and select Remove text before or Remove text after.
-
In the Clips Work Area, click on the Options button and then click Save.
![]()
![]()
The segment is truncated based on your cursor location. If you select Remove text before, the segment will be shortened to include only the content after the cursor. If you select Remove text after, the segment will be shortened to include only the content before the cursor.
In the example below, segment 4 started at 14:08 and ended at 14:18. If you left-click before the word "You" on line 14:13 and then right-click, selecting Remove text before results in segment 4 being shorted to 14:13-14:18.
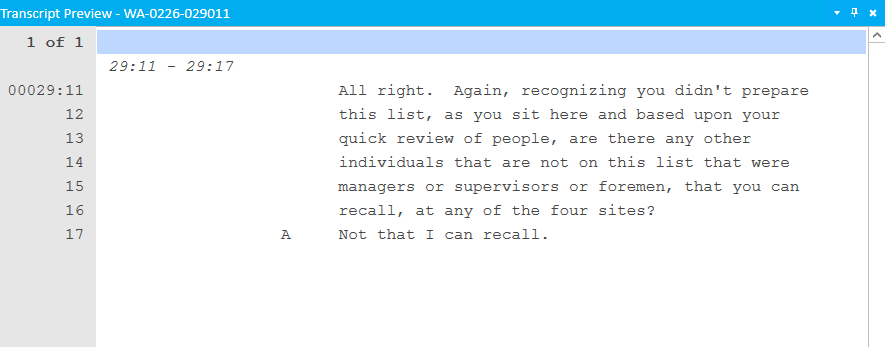
In the example below, the clip segment starts at 29:11 and ends at 29:23.
![]()
If you left-click after the word "recall" on line 29:17, and then right-click, you have the following options:
Selecting Remove text before results in the segment being shortened to 29:18-29:23.

Selecting Remove text after results in the segment being shortened to 29:11-29:17.
The revised segment appears under the Transcripts Explorer as well as in the Clips Explorer.
Related Topics
Version: 2023.8.12
Last Revision: 11/8/2023