Configure Printer Servers
To configure a printer server for LOCAL DISCOVERY:
-
Open the Batch Print Server on your machine.
-
The first time you start the Print Manager:
-
In the Login dialog box, click Configure, select the system directory configured for other LOCAL DISCOVERY products, and click OK.
-
Complete the Login dialog box with Super Administrator user name and password.
-
Click OK.
-
-
Select Menu > Configure Print Server.
-
If the Login dialog box appears, enter the Super Administrator user name and password and click OK.
-
In the Select Print Server dialog box, click Create New Print Server.
-
Enter a name for the print server and click OK. (This name is used in the Print Manager.)
-
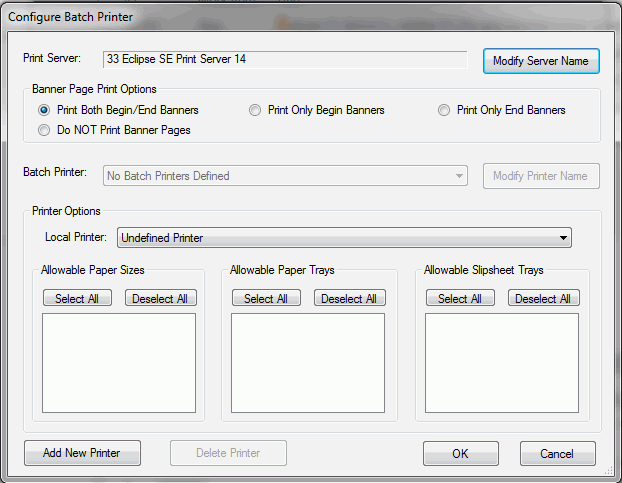
Complete the Configure Batch Printer dialog box as shown in the following figure and described in the following steps.
-
Select the needed Banner option. Banner pages are added for each print job.
-
Click Add New Printer, enter a name to be used in the printer listing, and click OK.
-
Batch Printer: Ensure that the printer defined in Click Add New Printer, enter a name to be used in the printer listing, and click OK. is selected in the Batch Printer field.
-
Local Printer: Select the actual printer to be used when the batch printer is selected.
-
Options: Select which paper sizes, paper trays, and slipsheet trays will be allowed for selection by users. (Slipsheets are used to separate documents within a print job.)
-
Repeat steps 9-12 to define additional printers.
-
When all printers are defined, click OK.
-
To define additional print servers, repeat this procedure.
-
To activate a particular server (make the Batch Printers available in Review):
-
Select Menu > Select Print Server.
-
Select the needed server and click OK.
-

Version: 2023.8.12
Last Revision: 11/8/2023