Export Facts
Users have the ability to export the facts of a case to a CSV file. When exporting facts, you can choose specific fields to appear in the report, as well as their sort order. To export your list of facts, complete the following steps:
-
From the dashboard, click the Fact Management module.

-
Select the Case Story tab in the left navigation panel.

-
Open the needed case by double-clicking the case name in the Cases table. Alternatively, you can select the appropriate case name, then click the Open Case button in the ribbon bar above the table.

-
Open the Facts Explorer by selecting the Facts tab on the left side of the page.
-
In the Facts Explorer, click the Export button in the top-right corner.
-
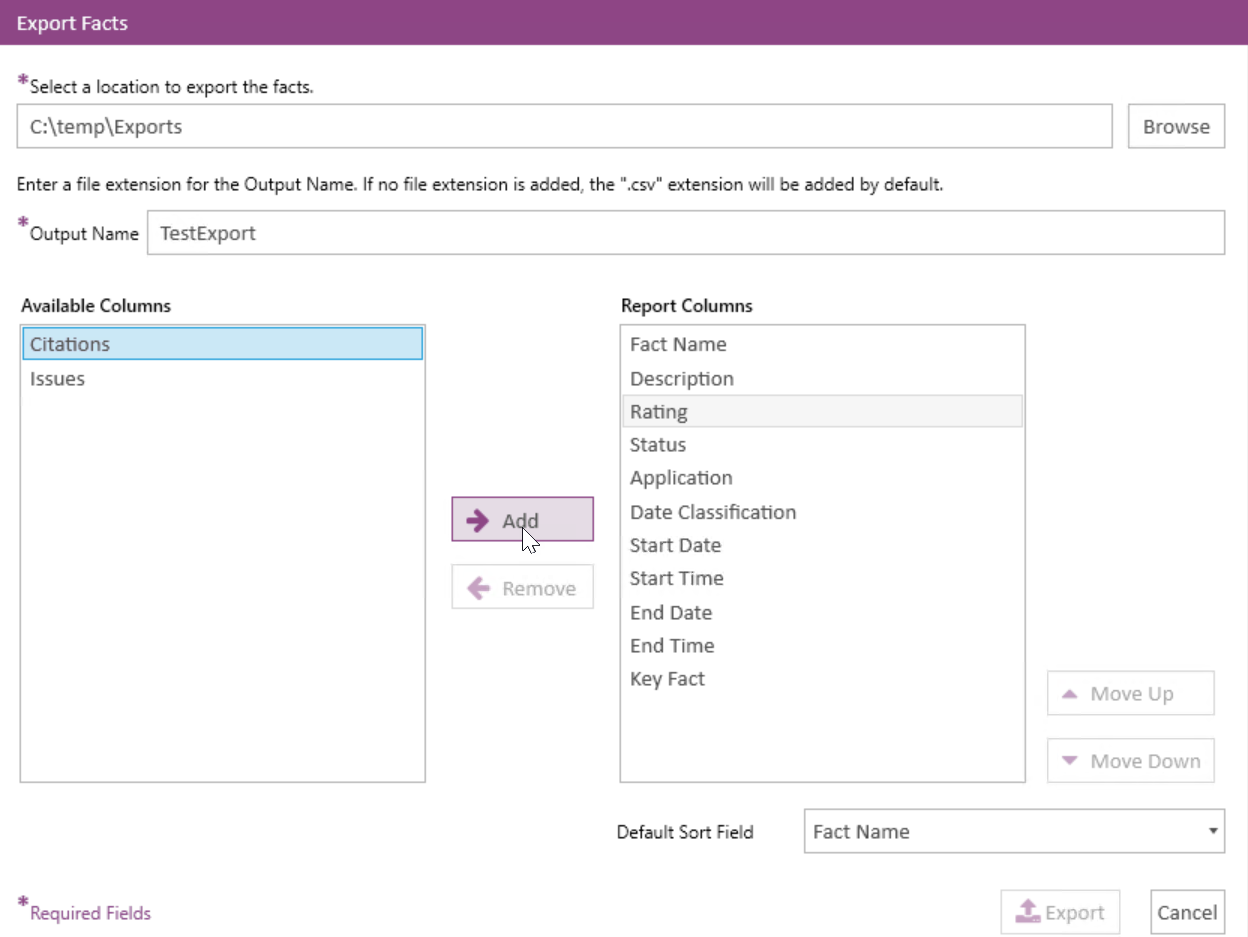
Click the Browse button in the dialog. The Browse for Folder dialog appears. Navigate to the location where you want the export file to be generated. Click the OK button in the Browse for Folder dialog.
-
In the Output File field, provide a name for the CSV file.
-
Next, select the fields you would like to include in the export. The Available Columns box displays the list of available fields that can be added to the report, but are not currently selected for export. The Report Columns box displays the list of columns that are selected for export.
-
If you would like to move a field from the Available Columns to the Report Columns box, select the field in the list and click the Add button.

-
If you would like to remove a field from the Reports Columns so that it does not appear in the exported file, select the field in the list and click the Remove button.

-
-
You can determine the order in which the columns display in the report. Columns that are higher in the Report Columns list display first. To change the order of these columns, select the field you would like to reposition, and click either the Move Up or Move Down button. The field is repositioned in the list accordingly. Repeat this process until the columns are arranged in the correct position.
-
In the Sort Field dropdown, select the field you would like to sort the report by. The report is sorted in alphanumerical order based on that field. For instance, if you select Start Date from the dropdown, the CSV displays the list of facts in chronological order based on the date provided in the "Start Date" field for each fact.
-
When you have finished configuring the export, click the Export button at the bottom of the dialog.


The Export Facts dialog appears.


The export file is generated at the location you selected.
Related Topics
Add a Fact to a Witness or Entity
Version: 2023.8.12
Last Revision: 11/8/2023