Create a Case
Applies To: LOCAL DISCOVERY
In this article
Step 1: Add Basic Case Information
Step 2: Load a Case Definition
Step 3: Define Database Fields
Step 5: Create Redaction Palette
In the Case Management module, you create cases into which you will later import images or native files. This topic contains high-level procedures to help you create a case in Case Management.
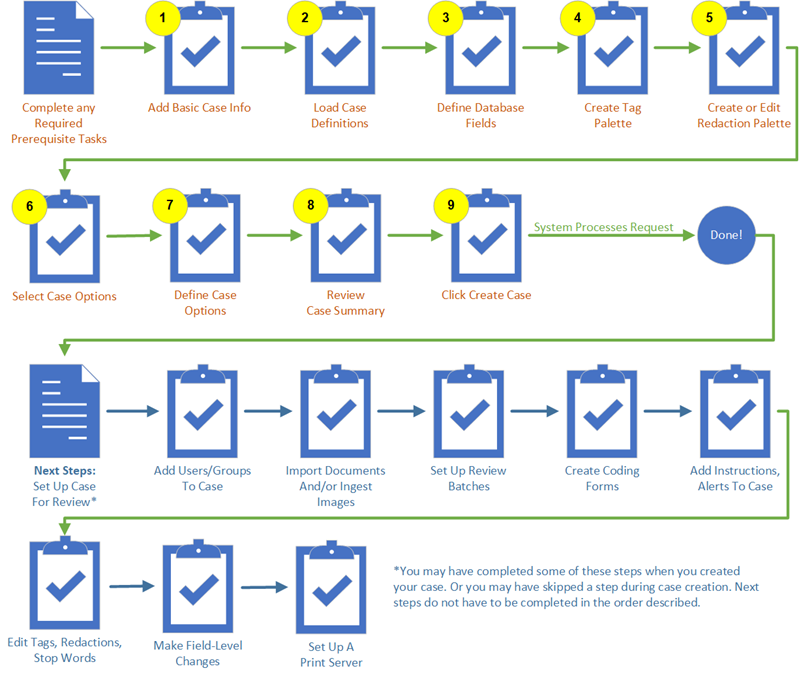
The following illustration shows the basic process outline. The numbers correspond to the procedures later in this topic. You can click on the numbered steps in the image to jump to a specific task in the workflow.
-
On the Dashboard, click the Administration module.

The Administration module displays.
-
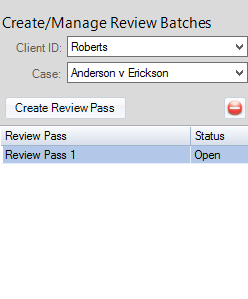
In the left navigation panel, expand the Batch Management menu and click Create/Manage Review Batches.

-
In the Create/Manage Review Batches workspace, select the Client and Case for which the review pass is being created.
-
Click Create Review Pass, then click the new review pass in the list.


|
Note: When a case is created, a TRIAL DIRECTOR case is automatically created as well. It will auto generate the case name in the directory structure during the case creation process. |
|
|
Tip: To make it easier to find the procedures you need, the procedures are collapsed. If you want to expand a procedure, click the triangle next to the procedure title to open and close the detailed information. |

 Step 1: Add Basic Case Information
The first step in creating a case involves defining the basic case details:
-
On the Dashboard, click the Case Management module.

-
In the navigation panel, click the Cases tab.

-
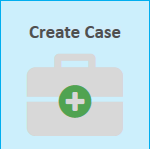
Click the Create Case button above the case table.
-
In the Case Info step, enter all information:
-
Client ID: Select the client whose case is being defined. If the client is not listed, add it as explained in Add a Client, then return to creating cases.
-
Case Name: Enter a name for the case. This name must be unique and cannot include certain special characters. The hyphen, underscore, and parentheses are among the characters allowed. Maximum length is 75 characters.
Note: The following characters are not permitted in a case name: \ ? / : * " < > |
-
Matter Number: This entry is optional. If needed, enter a case matter number of up to 100 characters.
-
Case Database Directory: The location where Case Management will place database-specific files and other files required for the case. A case-specific folder will be created for each case. The entry may be a mapped drive or UNC path, but it must be accessible by all users. (A UNC path can help ensure this.) The Case Database Directory can be one of the following:
-
The system directory identified when you first logged in. This is the default location.
-
Another directory defined to be the default data directory (see Configure System Level Options). This directory can optionally be set as the required directory (no override allowed during case creation).
-
A user-selected directory (if a required Case Database Directory is not defined).
-
-
-
When finished, click Next to continue with the next step.
Note: If you prefer to use the default case settings for all remaining options in the wizard, you can skip to the Summary step by clicking the View Summary button.

On the Summary page, you can review the options for the case and initiate case creation by clicking Create. See Step 8: Review Case Summary for more information.


Step 2: Load a Case Definition
The second step in creating a case is typically that of defining needed database fields.
|
|
NOTE: Each case can include a maximum of 500 fields. |
This step can be accomplished in one of 5 ways:
-
Option 1: Copy from Existing Case: Copy the definition of an existing case. All settings for the existing case will be used for the new case (make changes as needed), this includes:
-
Database field names and types
-
Tag palette
-
Redaction palette
-
Stop words
-
Case options
-
- Click the Option 1 - Copy from Existing Case option.
- Select a Client ID.
- Select a Case Name.
- Click Next.
- Review the copied case details on each of the subsequent tabs. You may need to change some of the settings. Any changes you make in the wizard will impact the current case you are creating and will not affect the existing case.
-
Option 2: Load From Case Definition File: Case Management allows you to create case definition (.CSE) files, which can serve as “templates” for future cases. All settings for the existing case will be used for the new case (make changes as needed). This includes:
-
Database field definitions
-
Tag and redaction palettes
-
Stop words and case options
-
Keywords
-
Coding Forms
See the
table below for more information on the case definition options.Case Definition Options
Option
Description
Select All
All case details in the .CSE file (per this table) will be used in the new case.
Database Fields
Field names, types, and flags (and control/pick/name list values if they were included in the .CSE file).
NOTE: System fields for which data is automatically calculated or determined (such as FILE_EXT and IMAGECNT fields) are not included; they are created automatically with default names.
Tag Palette
Tag groups and tags.
Redaction Palette
All aspects of each redaction category.
Stop Words
Words to be excluded from searches.
Key Words
Key word name, text/highlight colors, and terms.
Coding Forms
Coding forms, including form names, fields, tags, rules, and options.
Saved Searches
All saved searches.
Options
Tagging level, date format, history/tracking, and import validation options.
See the
table below for a comparison of what is included with the case definition file for options 1 and 2.Case Definition Options
settings
option 1
option 2
Database Fields
X
X
Tag Palette
X
X
Redaction Palette
X
X
Stop Words
X
X
Key Words
X
Coding Forms
X
Saved Searches
X
Options
X
X
- Click the Option 2 - Load from Case Definition File option.
-
Click the Browse button.
- Navigate to the location where the .CSE file is stored. Click on the file and click the Open button.
- Click Next.
NOTE: For steps on how to export a .CSE file, see the Export a Case Definition File section on Edit Case Details and Perform Basic Case Actions
-
-
Option 3: Load Fields from a Data Load File: Use a load file (.CSV, .DAT, and .DLF. Database field names will be defined. See the
table for more details about the supported file types.Load File Details
Load File
Description
A delimited ASCII text file typically with a delimiter format of quote-comma-quote or commas.
A delimited ASCII text file containing field data and metadata exported from Concordance or another product that can create such a file.
A .DLF file is a type of IPRO load-file format for the legal industry. It is an .XML file created when a case or data is exported from LOCAL DISCOVERY or other sources. .DLF files can contain all case details defined when a case is exported (as explained in Export Case Data).
- Click the Option 3 - Load Fields from a Data Load File option.
- Click the Browse button.
- Navigate to the location where the load file is stored. Click on the file and click the Open button.
- Select a Field Delimiter.When creating a case from a data load file such as a CSV or DAT, the delimiters will be automatically set for parsing of the database fields.
- Select a Quote Delimiter.
- Click Next.
-
Option 4: Use Default Template: The default template is a set of basic system fields that is pre-defined for your use.
- Click the Option 4: Use Default Template option.
- Click Next.
-
Option 5: Use Native File Ingestion Template: Provides you with a template that includes a set of fields. These are a pre-defined set of basic system fields as well as fields commonly used with native files, including several that correlate to e-mail content.
- Click the Option 5: Use Native File Ingestion Template option.
- Click Next.
NOTE:
Option 5: Use Native File Ingestion Template is the default template selected when you create a case.
With this option, you have the opportunity to change the case details (fields, tags, etc.) before the case is created. To use option 1:
Step 3: Define Database Fields
Create new fields or change pre-defined or imported fields on the Define Database tab.
About Database Fields
The Define Database tab lists all available fields and allows you to add and edit fields, as required to meet your business needs.
Basic System Fields: There are a number of fields that are required for every case and cannot be deleted from a case. ![]() Click here to see the basic system fields that are required fields and that cannot be deleted from a case.
Click here to see the basic system fields that are required fields and that cannot be deleted from a case.
|
BEGATTACH BEGDOC ENDATTACH ENDDOC |
EXTRACTEDTEXT MD5_HASH NATIVE SHA1_HASH |
Other System Field Types: There are additional field types included in the default case templates. These field types are used for case-specific purposes (e.g. CUSTODIAN field) or other reasons (e.g. FILE_EXT, etc. are used for reporting purposes such as in the Case Data Summary Report). Prior to release 2013.1.0, a FILETYPE field existed. This field is changed to the FILE_EXT field when you upgrade to 2013.1.0 or later. ![]() Click here to see a list of other system field types.
Click here to see a list of other system field types.
|
CUSTODIAN DUP_CUSTODIAN FILE_EXT FILE_ID |
IMAGECNT NATIVE_SIZE TEXT_SIZE UTC_DATETIME |
User-defined Fields: There are some field types that can be defined as needed for your case. ![]() Click here to view the list of user-defined fields.
Click here to view the list of user-defined fields.
|
DATE DATE_TIME DECIMAL |
DELETED MEMO MULTI_VALUE |
NUMERIC SINGLE_VALUE TIME |
|
|
Note: The DELETED field type is applied to fields deleted from an existing case; useful for administrative purposes. |
System-generated Fields: Case Management generates the following two system fields when a case is created; no user action is required (or possible) regarding the inclusion of these fields. ![]() Click here to see the system-generated fields table.
Click here to see the system-generated fields table.
|
_DOCID |
Includes a system-generated record identifier for internal use. |
|
_DOCTAGS |
Includes a list of all tags applied to each document. |
These fields appear in some other areas of the application (such as when importing or exporting data); it is optional to map or select them for these functions. These fields can be displayed in Review.
Field details: Each of the available fields is listed in the Field Types table. Click here to view the ![]() Field Types table and notes about the table.
Field Types table and notes about the table.
When reviewing the field table, note the following:
- Data Type Details
-
Database data types are all variable-length Unicode character strings.
-
The MEMO data type refers to MEMO, MULTI_VALUE, and EXTRACTEDTEXT fields in which the data exceeds 250 characters in length, for which case data is stored in a special database table.
- Field Mapping - Generally, the fields you define using these field types will match the fields defined in your load files or other sources (such as ingested native files). It is possible to map more than one field to a single field in your case. See Overview: Import/Export for details on importing data or Overview: Processing Files for details on ingesting files.
|
Field |
Max. Size |
Data Type |
Notes |
|---|---|---|---|
|
BEGATTACH |
80 char. |
Variable-length string |
|
|
BEGDOC |
NA |
Var.-length string |
|
|
CUSTODIAN |
NA |
Var.-length string |
|
|
8 char. (as stored internally); see notes. |
Var.-length string |
|
|
|
14 char. (as stored internally); see notes. |
Var.-length string |
|
|
|
DECIMAL |
Any value from -2GB to +2GB |
Var.-length string |
|
|
NA |
NA |
|
|
|
DUP_ |
NA |
Var.-length string |
|
|
ENDATTACH |
80 char. |
Var.-length string |
|
|
ENDDOC |
NA |
Var.-length string |
|
|
EXTRACTED |
1 GB |
≤250 char.: var. length string >250 char.: MEMO |
|
|
(Required) |
256 char. |
Var.-length string |
|
|
(Required) |
NA |
Numeric |
|
|
IMAGECNT (Required) |
NA |
Numeric |
|
|
(Required) |
250 |
Var.-length string |
|
|
1 GB |
≤250 char.: var. length string >250 char.: MEMO |
Text field that allows large amounts of text. |
|
|
256 char. per value; |
≤250 char.: var. length string >250 char.: MEMO |
|
|
|
(Required) |
256 char. |
Var.-length string |
|
|
(Required) |
NA |
Numeric |
|
|
Any value from |
Numeric |
|
|
|
SHA1_HASH (Required) |
250 |
Var.-length string |
|
|
1,000 char. |
Var.-length string |
Any single-value text data, such as an Email Subject field. |
|
|
(Required) |
NA |
Numeric |
|
|
6 char. (as stored internally); see notes. |
Var.-length string |
|
|
|
14 char. (as stored internally); see notes. |
Var.-length string |
|
Field options and flags: There are additional options that can be set for fields. These settings provide additional functionality during review. Default settings and available options vary by field type; check the selections when creating new fields.
![]() Click here to see the available field options and flags.
Click here to see the available field options and flags.
|
Option/Flag |
Description |
|
Basic options |
|
|
Include in Full Text Index |
Select this option to include field data in the full-text index. This option enables searching of field content in Review (using the quick search). To exclude the field from indexing, make sure the option is not selected. Note: Fields not relevant to full-text key word searching can be excluded from indexing to improve case maintenance (index rebuilding) and search efficiency. The Advanced Search can be used to search specific fields that are not included in the index. |
|
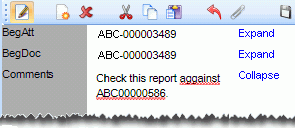
Use Spell Check |
Select this option to enable a standard spell-check function for the field in Record View in Review. When this option is selected, misspelled words in the field are indicated with a red line while users are editing in Record View, as shown in this example. |
|
Auto-Sort |
For MULTI_VALUE fields only, select this option to sort the contents of the field. Consider a TO field containing multiple email addresses: Without option With option jsmith@myco.com; ahall@myco.com; bbrown@myco.com; bbrown@myco.com; ahall@myco.com jsmith@myco.com |
|
Flags |
|
|
None |
No flags will be applied to the field. |
|
Select to allow Review users to sort a field (its column) in the case table (Case View, Search Results, etc. tab). Typical sorting rules apply. Also allows:
Only the first 250 characters are considered for sorting/searching. (A “SortKey” index is used to facilitate searching and sorting. Only the first 250 characters of a field are included in the SortKey index, as compared with the Full Text index, which contains the entire field content.) NOTE: DATE, DATE_TIME, and TIME fields are sortable whether or not the Sort Key flag is set. |
|
|
Select to enable Sort Key features and also specify that the field will have unique values. This option is required for some system fields; other fields can be primary keys if values are unique. When a case is imported, primary-key fields are checked to ensure all values are unique; if a duplicate value is detected, an error is logged and the record is skipped. |
|
|
Select this option to enable Sort Key features for the field and also specify that the field can be selected for batch processes and specific queries. In addition, a control list can be included (discussed below). |
|
|
Additional options |
|
|
Enter values manually in the List Values field or import them from a text file (one item per line). Users may also add values in Review if they have the needed privilege. Pick list values can be a maximum of 250 characters in length. |
|
|
If the Category flag is set, select this option if you want to define a specific set of values as part of the category definition. For example, if a Custodian field is defined with the Category flag and includes control list values of “Robert Smith,” “Henry Brown,” and “Mary Jones,” only records with those names in the Custodian field will be imported. Note:
|
|
|
Select this option to enable a single pick list for use in multiple fields. A name list can be useful for users who are editing email fields such as To, CC/BCC, Reply To, or any fields for which the same set of values is needed. Add names to the list using the procedures described for pick lists. |
|
|
Default Field Access |
|
|
This section allows you to define field-level security, either for a field in general or by group or user. |
|
|
Default Field Access |
Select the level of security for the field:
|
|
Security Restrictions by Group/User |
Define field security based on specific groups and/or users. |
Add, Edit, or Remove Fields
Complete the following steps to add, edit, or remove fields.
|
|
Note: Before you begin, make sure to read the sections which describe the field types. See About Database Fields. |
-
After completing Step 2, continue with Define Database Fields page of the wizard.
-
You can add, edit, or remove fields, as required to meet your business needs.
To add a field:
- Click Add.
-
In the Name field, enter a name for the field.
NOTES:
-
Do not begin and end a field name with parentheses. For example, do not name a field
(AUTHOR). Parentheses within a field name, such asAUTHOR(S), can be used, however. -
Do not use “_DocID” as a field name; this name is reserved.
-
- Select a field type from the Field Type drop down menu. This is the type of data that will populate the field. Selecting MULTI_VALUE enables you to add a field that has a list of values the user can choose from.
- Select the flags to use for the field. The options are:
- None
- Sort Key - If you pick Sort Key you can also pick one of the following:
- Use Pick List - For more information, see Use Pick List.
- Use Control List - For more information, see Use Control List.
- Use Name List - For more information, see Use Name List.
- Primary Key (Sortable)
- Category - If you pick Category you can also pick one of the following:
- Use Pick List - For more information, see Use Pick List.
- Use Control List - For more information, see Use Control List.
- Use Name List - For more information, see Use Name List.
-
If you selected Use Pick List, Use Control List, or Use Name List:
- You can enter the values for your list in the box below. You should enter one list item value per line.
- You can also import a list (.csv, .txt, or .xls format) by clicking on the Import button, locating and selecting the file, and clicking the Open button.
- When finished creating the list, click Save.
- The field is added to the database and the Define Database Fields page displays. You can repeat this process for up to 500 fields, which is the field limit for the case.
- When finished, click Next. Or if you would like to apply the default settings for all remaining options in the Add Case wizard, click the View Summary button to skip ahead to the Summary page. See Step 8: Review Case Summary.
To edit a field:
- Click on a field in the Database Fields table and then click the Edit button.
-
In the Name field, edit the field name.
NOTE: Ensure required system fields are defined as needed; they are typically not edited (other than field name changes) after a case is created.
For other field types, editing limitations may exist after a case is created and/or data added. Limitations will be indicated in the Field Definition dialog box.
- Select a field type from the Field Type drop down menu. This is the type of data that will populate the field. Selecting MULTI_VALUE enables you to add field that has a list of values the user can choose from.
- Select the flags to use for the field. The options are:
- None
- Sort Key - If you pick Sort Key you must also pick one of the following:
- Use Pick List - For more information, see Use Pick List.
- Use Control List - For more information, see Use Control List.
- Use Name List - For more information, see Use Name List.
- Primary Key (Sortable)
- Category - If you pick Category you must also pick one of the following:
- Use Pick List - For more information, see Use Pick List.
- Use Control List - For more information, see Use Control List.
- Use Name List - For more information, see Use Name List.
-
If you selected Use Pick List, Use Control List, or Use Name List:
- You can enter the values for your list in the box below. You should enter one list item value per line.
- You can also import a list (.csv, .txt, or .xls format) by clicking on the Import button, locating and selecting the file, and clicking the Open button.
- When finished creating the list, click Save.
- The field is added to the database and the Define Database Fields page displays. You can repeat this process for up to 500 fields, which is the field limit for the case.
- When finished, click Next. Or if you would like to apply the default settings for all remaining options in the Add Case wizard, click the View Summary button to skip ahead to the Summary page. See Step 8: Review Case Summary.
To remove a field:
-
Click on a field in the Database Fields table and click the Remove button.
The field is removed from the list of fields for the case.
-
When finished, click Next. Or if you would like to apply the default settings for all remaining options in the Add Case wizard, click the View Summary button to skip ahead to the Summary page. See Step 8: Review Case Summary.
Step 4: Create a Tag Palette
The tag palette includes groups of tags that are to be applied to each document and/or page in your case. To ensure proper and efficient review processes within your organization, Case Management enables you to define tags, tag groups, and tagging rules.
Complete this section to define tags for your new case. Or, you can skip to the next step in the wizard and manage tags after the case is created.
|
|
NOTE: In LOCAL DISCOVERY, tags can be applied at the document level and/or the individual page level. All tags that you define for a case can be used as document tags or page tags (depending on user privileges). |
About tags
As with many LOCAL DISCOVERY tasks, proper planning will help ensure that the tags and tag groups you define meet your needs and include the needed rules and options.
-
Groups: Consider the groups you will need, naming conventions, and which groups should have the rules explained in the following table.
-
Tags: Give some thought to the tags that will be included in each group, as well as tag options that apply.
-
Nested tags: Understand the behavior of nested tags so that tags will be organized as intended.
Group rules
![]() Click here to view the table that lists rules that can be applied to tag groups.
Click here to view the table that lists rules that can be applied to tag groups.
|
Rule |
If this rule is set, then... |
||
|
Exclusive |
Only one tag in the group can be applied to a document. |
||
|
Required |
At least one tag in the group must be applied to all documents in a batch before a batch can be marked complete. |
||
|
Locked |
Maintain the current state of tags in the group. That is, if a tag in the group has been applied to documents, it remains in this state. If a tag has not been applied to documents, it cannot be applied. |
||
|
Require Child Tag |
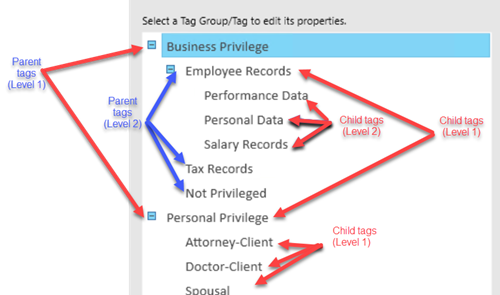
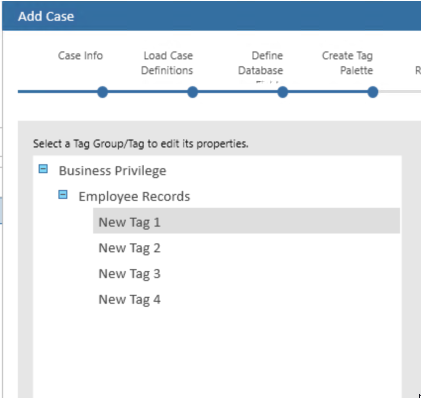
This rule applies to groups with nested (multiple levels of) tags as shown in this example. If this rule is selected, users will not be able to apply a parent tag by itself. Parent tags will be applied only when the lowest level of child tag is applied. In this example, the “Business Privilege” tag cannot be applied; it will automatically be applied when at least one of the third-level tags is applied. |
||
|
Tag Entire Family |
When a tag in the group is applied to a document, the tag will be applied to the selected document and its relatives (all generations of parents, children, siblings).
|

Tag options
![]() Click here to view the table that lists options available for tags.
Click here to view the table that lists options available for tags.
|
Option |
Description |
|||
|
Show on Default Palette |
By default, all tags will appear on the case’s tag palette in Review. If you clear this option for a tag, it will not appear on the palette and will not be available to users who have access to the associated case or review batch (unless they have the privilege to modify the tag palette). Users cannot apply tags that are not shown, nor can they search for or create a Smart Folder for such tags. |
|||
|
Include in Privilege Report |
When a tag is defined with this option, it will be included in the Privilege report. See Overview: Reports for details about this report. |
|||
|
Also Create Transcript Issue |
Select this option to add document tags to the transcript issues palette (in addition to the case tag palette). When this option is selected, document tags are added as issue tags in the Review Transcript Work Area.
|
|||
Nested (Parent/Child) Tags
“Nested” tags include primary (“parent”) tags and one or more subordinate (“child”) tags, as in the following example. Multiple levels of tags can exist, creating a “tree” of related tags.
![]() Click here to see a description of the behavior of "nested" tags.
Click here to see a description of the behavior of "nested" tags.
The behavior of nested tags is the same in Review whether the tag is being applied to a single record or multiple records (including applying a tag to search results). Behavior differs a bit depending on whether or not the Require Child Tag rule has been set for the tag group containing the nested tags. (See Group rules.)
-
If the Require Child Tag rule has not been applied to the tag group, behavior will be as follows:
-
If a parent tag is applied, it alone is applied.
-
If a child tag is applied, the child tag and its parent tag(s) up the tree are applied.
-
If a parent tag is removed, any child tags (down the tree) that have been applied are also removed.
-
If a child tag is removed, the parent tag(s) (up the tree) will remain applied.
-
-
If the Require Child Tag rule has been applied to the tag group, behavior will be as follows:
-
A parent tag cannot be applied by itself; it will automatically be applied when a child tag is applied (child tag at the lowest level of tags for any set of tags within the group).
-
If a child tag is applied, the child tag and its parent tag(s) up the tree are applied.
-
If a parent tag is removed, any child tags (down the tree) that have been applied are also removed.
-
If a child tag is the only tag at its level, it cannot be removed; it will be removed automatically when its parent is removed.
-
If multiple child tags exist at a particular level and more than one of these tags is applied, then individual child tags in that level can be removed as long as at least one child tag is still applied.
-
Note that error messages will appear in the Review status bar regarding application of tags when this rule is in effect.
Define tags for a new case
The Step 4. Create Tag Palette tab allows you to create new tags and/or modify tags that have been added from an existing case or case definition (.CSE) file.
|
|
NOTE: Before you begin defining tags, give some thought to tag naming conventions, grouping, and organization. Ensure that reviewers will easily understand how to use the tags. If you have not done so already, see About tags. |
To define tags while creating a new case:
-
After completing Step 3, continue with the Create Tag Palette page of the wizard.
NOTE: If you have not already done so, review About tags.
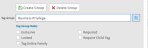
- To create a new tag palette or to edit and remove tags and tag groups, click Modify Tag Palette.
-
To create new tag groups:
-
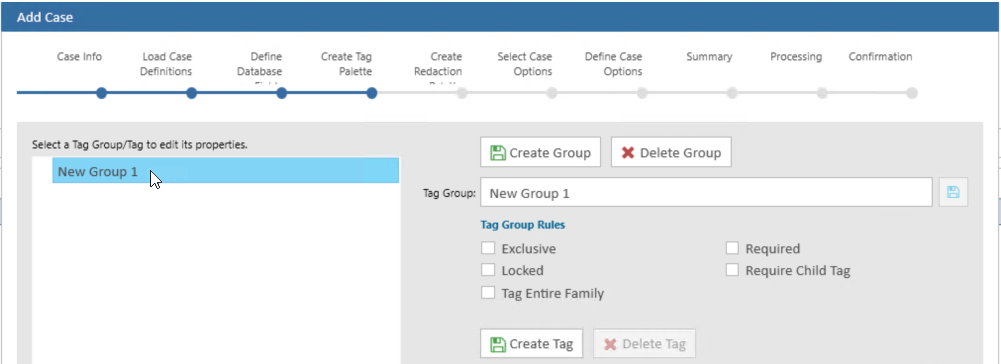
Click the Create Group button. A new group appears in the Modify Tag Palette box, in the left pane of the wizard.
-
In the Modify Tag Palette box, click on the group you just created.
-
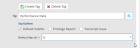
In the Tag Group field, on the right side of the wizard, type a new name for the group.
- In the Tag Group Rules section, check the rules you want to apply to the tag group.
-
When finished, click the Save
 button.
-
-
To create nested (child) tags:
- In the Modify Tag Palette box, in the left pane of the wizard, click on the group you want to add child tags to.
-
Click the Create Tag button. A new child tag appears in the Modify Tag Palette box, in the left pane of the wizard.
-
In the Modify Tag Palette box, click on the child tag you just created.

-
In the Tag field, on the right side of the wizard, type a new name for the tag.
-
In the Tag Options section, check rules you want to apply to the tag.
- Click the Save button.
- Repeat these steps for each of the child tags you want to create for the selected group tag.
-
To modify tag groups or tags:
-
In the Modify Tag Palette box, select the tag group or tag.
-
In the Tag Group or Tag section (depending on whether you selected a group or a tag) make changes as necessary and click the Save
button. -
Repeat step b for all changes.
-
-
To delete a tag group, select a tag group and click the Delete Group button.
- To delete a tag, select a tag and click the Delete Tag button.
- Users also have the option to use keyboard shortcuts to apply tags to documents. Shortcuts for tags begin with the Ctrl key. Define shortcuts for the lowest level of tags (that is, not parent tags or tag groups) using a letter (A-Z). To assist users, shortcut keys appear in the Doc and Page Tags tabs in Review.
- When finished, click Next. Or if you would like to apply the default settings for all remaining options in the Add Case wizard, click the View Summary button to skip ahead to the Summary page. See Step 8: Review Case Summary.


Step 5: Create Redaction Palette
About redactions
Up to 99 redaction categories can be defined.
-
If you create a case from an existing case, the redactions defined for that case will be included in the new case.
-
If you create a case using a .CSE file, you have the option to include the redactions defined in the .CSE file. If you do not include the redactions in the .CSE file, then the default redaction palette will be used for your new case.
-
If you create a case based on a blank template, the default redaction palette will be used.
Complete this section to define redactions for your new case. Or, you can skip the Create Redaction Palette tab and manage redactions after the case is created.
Planning
Before you begin, plan your redaction palette.
-
Redaction categories can be created with or without labels.
-
Redaction and label font color can be selected.
-
The order in which redactions are defined determines how they will be listed for selection in Review, so redactions should be defined in the order of frequency of use. In particular, the first redaction defined will be the default selection in Review; make sure it will be the most frequently used.
Identify the redaction categories you will need for the case, and give some thought to the labeling conventions as well as colors.
Define redactions for a new case
The Step 5 Create Redaction Palette step allows you to create new redactions and/or modify redactions that have been added from an existing case or case definition (.CSE) file.
|
|
NOTE: Before you begin creating a redaction palette, if you have not yet done so, review About redactions. |
To define tags while creating a new case:
-
After completing Step 4, continue with the Create Redaction Palette page of the wizard.
-
To create a new redaction:
-
Click the Add button.
-
Complete the Add Redaction dialog box as described in the following table.
-
When finished, click Save.
- Repeat these steps to add additional redactions.
Redaction Definition
Item
Description
Label
Required: Enter a name for the redaction. This name will appear on the redaction, and will be scaled to fit the size of the redaction applied by the user.
Font, Font Size, and Font Style
To change the font, font size, and font style, click the drop down arrows to make selections. Note: because labels are resized when redactions are applied, the font size defined here is simply a baseline.
Font Color and Redaction Color
To change the font and/or redaction color, click the drop down arrow for each and select a color from the color palette.
Description
Optional: Enter notes or details about this redaction.
-
-
To modify a redaction:
-
Click the Edit button.
-
Edit the redaction, as necessary.
-
When finished, click Save.
- Repeat these steps to edit additional redactions.
-
-
To remove a redaction:
-
Click a redaction to be removed.
-
Click the Remove button.
The redaction is removed from the Redaction palette.
-
Repeat these steps for all redactions to be deleted.
-
-
When finished, click Next. Or if you would like to apply the default settings for all remaining options in the Add Case wizard, click the View Summary button to skip ahead to the Summary page. See Step 8: Review Case Summary.
Step 6: Select Case Options
Case options allow you to define tagging, history/tracking, and date format details. Default selections exist for all options. If the default selections are not correct for your case make changes as follows:
-
After completing Step 5, continue with Select Case Options page of the wizard.
-
In the Tagging Options group, select the needed tagging option:
-
Limit tags to document level: A reviewer will be able to tag documents but not individual pages of a multi-page document.
-
Limit tags to page level: A reviewer must tag each page of a multi-page document.
-
Allow tagging at document and page level: A reviewer can decide whether to tag a document or individual pages of a multi-page document.
-
-
In the History/Tracking Options group, select or clear the actions to be recorded for reporting purposes. Each selected action will be recorded in the database and details will be presented in one of the reports explained in Overview: Reports.
-
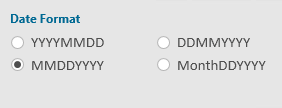
In the Date Format Options group, select the format for DATE and/or DATE_TIME fields (see User-defined Fields). These selections specify how dates will display in Review (after data is imported and/or a reviewer edits a date field).
-
Display Format: select the order of date components as shown in the figure on the right. Day = dd, month = mm, and year = yyyy.
 Click here to see a table that lists date format examples.
Date in
Load File ±Date will display as...
Date Format
Delim.
Zero Fill
May 2012
yyyymmdd
/
(no option selected)
2012/05
.
Do NOT Allow Partial...
2012.05.00
month dd, yyyy
na
Do NOT Allow Partial...
Use Nine to Fill...
May 99, 2012
Empty date field
ddmmyyyy
-
Fill Empty Dates
00-00-0000
mmddyyyy
None
Fill Empty Dates
Use Nine to Fill...
99999999
month dd, yyyy
na
Do NOT Allow Partial...
Unknown 00, 0000
±Or entered by reviewer in a coding form or the case table.
-
Delimiter: Select the separator for date components as shown in the following figure.

-
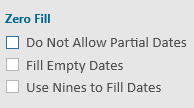
Zero Fill: Select the manner in which partial or empty date fields are handled. See the table below for examples describing how empty or partial dates are handled:
zero fill options selected
Description of outcome
Example Partial Date
Imported date value
No action is taken on the data. Partial dates come in as partial dates and blank date fields remain blank. All dates will be padded based on the Display Format chosen for the case.
5/0/2019
5/1/2019
<blank date>
05/00/2019
05/01/2019
None, the field is blank
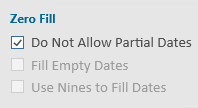
If a document has a partial date, the record will be ingested but the partial date will be blanked out. An error message is logged notifying you that the date in the load file is invalid. All dates will be padded based on the Display Format chosen for the case.
5/1/2019
5/1/19
1/0/2017
05/01/2019
05/01/2019
None, the field is blank

If a date field in a record is blank the field will be filled with zeroes.
<blank date>
00/00/0000
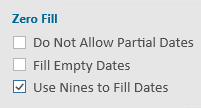
If a document has a partial date, the empty portion of the date is filled with nines. All dates will be padded based on the Display Format chosen for the case.
1/0/2017
1/2/17
<blank date>
01/99/2017
01/02/2017
None, the field is blank

During import, if a document has a partial date, the empty portion of the date is filled with nines. Blank dates are also filled with nines.
If a date field in a record is blank, the field will be filled with zeroes.
1/0/2017
<blank date>
01/99/2017
99/99/9999
-
-
To require validation of the load file data that you will import after the case is created, select the Require Validation of Load Files option. When this option is selected, a warning will display during the import process if any errors exist in the load file (for example, missing images).
-
(Optional) Native Time Zone: This setting controls the time used during date and time formatting. It controls how header date and time values display for emails in the Quick View tab, and also controls the date and time for TIFF images generated from the Quick View tab (TIFF-on-the-Fly). The default setting is (UTC) Coordinated Universal Time (0 offset).
-
Stop words are automatically enabled for any newly created case. To make it so that these terms can be searched as well, select the Disable use of Stop Word List option. For more information regarding stop words, see Work with Stop Words and Key Words.
-
When finished, click Next. Or if you would like to apply the default settings for all remaining options in the Add Case wizard, click the View Summary button to skip ahead to the Summary page. See Step 8: Review Case Summary.
In Review, this setting will not affect or modify dates and times stored as text or in the metadata fields associated with the displayed values. Thus, the values in the native files may differ from those in the Quick View tab (or TIFF-on the-Fly images). To modify the native time zone, select a timezone from the drop down.
|
|
NOTE: An offset may also be defined in IPRO eCapture. If your case documents will come from eCapture, you may want to check with the eCapture administrator and use the same time zone. |
Step 7: Define Case Options
-
After completing Step 6, continue with the Define Case Options page of the wizard.
-
In the Case Administrators group, select the users that will be case administrators for the case you are creating.
- In the Stop Words group, enter the stop words for the case. Case Management includes 128 default stop words. Additional stop words for your case can be defined now or after the case is created. For more information regarding stop words, see Work with Stop Words and Key Words.
-
When finished, click Next.
Step 8: Review Case Summary
When all steps have been completed, Case Management checks your entries and presents a summary.
-
After completing Step 7, the Summary page displays.
-
Review the basic details of your new case.
-
Click the Edit button to change the Client ID, case name, matter number, etc.
-
When all case details shown on this tab are correct, click Create and wait as Case Management establishes the case.
-
After the case is created, the Confirmation page displays. Click Close to close the wizard.
Related Topics
Version: 2023.8.12
Last Revision: 11/8/2023